
Page 25 - ENGLISH E-MODULE WRITING PROCEDURE TEXT REVISI
P. 25
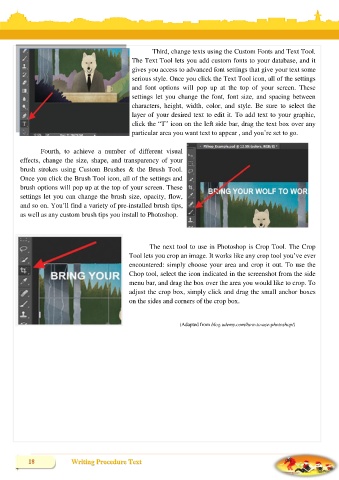
Third, change texts using the Custom Fonts and Text Tool.
                                               The Text Tool lets you add custom fonts to your database, and it
                                               gives you access to advanced font settings that give your text some
                                               serious style. Once you click the Text Tool icon, all of the settings
                                               and  font  options  will  pop  up  at  the  top  of  your  screen.  These
                                               settings  let  you  change  the  font,  font  size,  and  spacing  between
                                               characters,  height,  width,  color,  and  style.  Be  sure  to  select  the
                                               layer of your desired text to edit it. To add text to your graphic,
                                               click the ―T‖ icon on the left side bar, drag the text box over any
                                                particular area you want text to appear , and you‘re set to go.


               Fourth,  to  achieve  a  number  of  different  visual
        effects,  change  the  size,  shape,  and  transparency  of  your
        brush  strokes  using  Custom  Brushes  &  the  Brush  Tool.
        Once you click the Brush Tool icon, all of the settings and
        brush options will pop up at the top of your screen. These
        settings let you can change the brush size, opacity, flow,
        and so on. You‘ll find a variety of pre-installed brush tips,
        as well as any custom brush tips you install to Photoshop.


                                                      The next tool to use in Photoshop is Crop Tool. The Crop
                                              Tool lets you crop an image. It works like any crop tool you‘ve ever
                                              encountered: simply choose your area and crop it out. To use the
                                              Chop tool, select the icon indicated in the screenshot from the side
                                              menu bar, and drag the box over the area you would like to crop. To
                                              adjust the crop box, simply click and drag the small anchor boxes
                                              on the sides and corners of the crop box.


                                                                (Adapted from blog.udemy.com/how-to-use-photoshop/)


                          Writing Procedure Text