
Page 89 - MO 2022
P. 89
READ THROUGH ALL INSTRUCTIONS
BEFORE BEGINNING. SEW PIECES RIGHT SIDES TOGETHER AND USE A 1/4 ” SEAM ALLOWANCE THROUGHOUT UNLESS OTHERWISE STATED. CUTTING DIMENSIONS ARE HEIGHT (LENGTH- WISE GRAIN) OF FABRIC X WIDTH (CROSSWISE GRAIN WITH SELVAGES ON SIDES) OF FABRIC.
CUTTING:
From Main Fabric:
Cut Back Main (to be quilted) — 13” 3 18” Cut Front Border — 3” 3 17”
From Lining Fabric:
Cut Back Lining (to be quilted) — 13” 3 18” Cut Border Lining — 3” 3 17”
From Coordinating Fabric:
Cut Bias Binding — 13-1/2” 3 13-1/2” Cut Handle — 4” 3 12”
From ByAnnie’s Soft and Stable®:
Cut Back Stabilizer — 13” 3 18”
From FusibleInterfacing:
Cut Border Interfacing — 3” 3 17” Cut Handle Interfacing — 4” 3 12”
From Mesh Fabric:
Cut Mesh Front — 8-1/2” 3 17” ASSEMBLY:
Quilt to Prepare Bag Back
1. Sandwich the 13” 3 18” Back Lining, Back Stabilizer, and Back Main pieces (lining face down, Soft and Stable, main fabric face up) and quilt. Pin to secure layers.
2. Quilt as desired using a medium-length machine stitch. If you are straight stitching, a walking foot helps all three layers move evenly under the foot without shifting or pulling.
3. Trim the quilted piece to 11” 3 16” and sew 1/8” from edge to seal edges. This piece will now be called the Bag Back; set aside.
Prepare Bias Binding
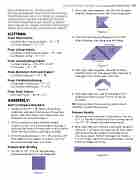
1. Cut the 13-1/2” 3 13-1/2” Bias Binding (coordinating fabric) in half diagonally
2.
3.
With right sides together, sew the two triangles together along one short side. Press seam open.
Figure 2
Fromtheresultingparallelogram,cut2-1/4” strips, aligning ruler along long bias edge.
EAST CENTRAL REGION ALL MISSOURI SHOP HOP 89
biabsieadsgeedge
bias edge
1⁄4
21⁄4 1⁄4
21⁄4 21⁄4 21⁄42 21⁄4
21⁄4 21⁄4 221⁄4
4.
5.
Figure 3
With right sides together, join ends of strips, offsetting tips 1/4” and sewing from cleavage to cleavage. Press seams open; trim tips.
Figure 4
bias edge Withrightsidesout,foldthebindinginhalf
lengthwise and pin every 3” to241⁄4” to secure;
21⁄4 smoother, wrinkle-free binding.
21⁄4 2 biabsieadsgeedge
bias edge
set aside.
21⁄4
21⁄4
TIP: Pinning rather than pressing yields a much
bias edge
Prepare Handle
1. Following manufacturer’s instructions, fuse the 4” 3 12” Handle Interfacing to the wrong side of the 4” 3 12” Handle (coordinating fabric).
2. With right side out, fold the interfaced Handle in half to 2” 3 12”; press to mark center fold. Open and bring long raw edges to pressed center line; press again. Fold in half again to create a
1” 3 12” strap. Topstitch around all sides, sewing 1/8” from edge; set aside.
Figure 5
Figure 1
seam seam
seam
seam
