
Page 90 - MO 2022
P. 90
90 ALL MISSOURI SHOP HOP EAST CENTRAL REGION
Prepare Bag Front
1. Attach zipper to Mesh Front.
a. With WRONG sides together, zipper slide to left and mesh on top, clip the 8-1/2” 3 17” Mesh Front to the long edge of a 24” zipper, allowing zipper to extend beyond mesh on each end.
Figure 6
b. Sew the mesh to the zipper, stitching 1/4” along the top long edge. Finger-press the zipper tape to the front of the mesh and sew along the very edge of the zipper tape, flat- tening the tape against the mesh as you go, enclosing the raw edges of mesh.
c. Trim mesh at bottom to make a piece 8-1/2” high, measuring from top long edge of zipper tape to bottom of mesh.
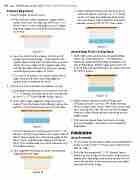
2. Attach the Front Border and Border Lining.
a. Following manufacturer’s instructions, fuse the 3” 3 17” Border Interfacing to the wrong side of the 3” 3 17” Front Border (main fabric).
b. With right sides together, align the top 17” side of the interfaced Front Border along the bottom of the Mesh Front; pin/clip to hold.
Figure 7
c. Turn the piece over and position the 3” 3 17” Border Lining (lining fabric) with right side of fabric down along the same long edge of the Mesh Front, aligning raw edges. Pin/clip to hold. This sandwiches the mesh between the two fabric pieces.
d. Sew together through all layers along long clipped/pinned edge.
e. Open border pieces and carefully press seams to fabric, making a 11” 3 17” piece which will now be called the Bag Front. On main fabric side, topstitch along the border, sewing 1/8” to 1/4” from seam.
Figure 9
Attach Bag Front to Bag Back
1. With right side up, position prepared Bag Front on lining side of 11” 3 16” Bag Back (quilted), aligning long edge of zipper with top of Bag Back. Zipper tape and mesh will extend beyond quilted fabric on sides; pin/clip to hold in place.
Figure 10
2. Beginning at top left corner of bag, sew
through all layers with an 1/8” seam, sewing across zipper tape, down right side, across bot- tom, and up left side. Be sure to move zipper slide to inside of bag before stitching across zipper tape.
3. Trim excess zipper tape and mesh on sides even with edges. The piece is now called the
5′′ 5′′
Bag Body.
FINISHING: 5′′ 5′′
Attach Handle
5′′ 5′′
21⁄2′′ circle
21⁄2′′ circle
21⁄2′′ circle
1. On the back (main fabric side) of the Bag Body, make a small mark 5” in from each side on the top 16” edge.
2. Pin/clip the prepared 1” 3 12” Handle (main
fabric) to the inside of the marks, aligning raw
edges with top edge and being careful not to
twist the handle. Stitch across each raw edge,
sewing 1/8” from edge.
5′′ 5′′
Figure 8
21⁄2′′
circle
