
Page 24 - Demo
P. 24
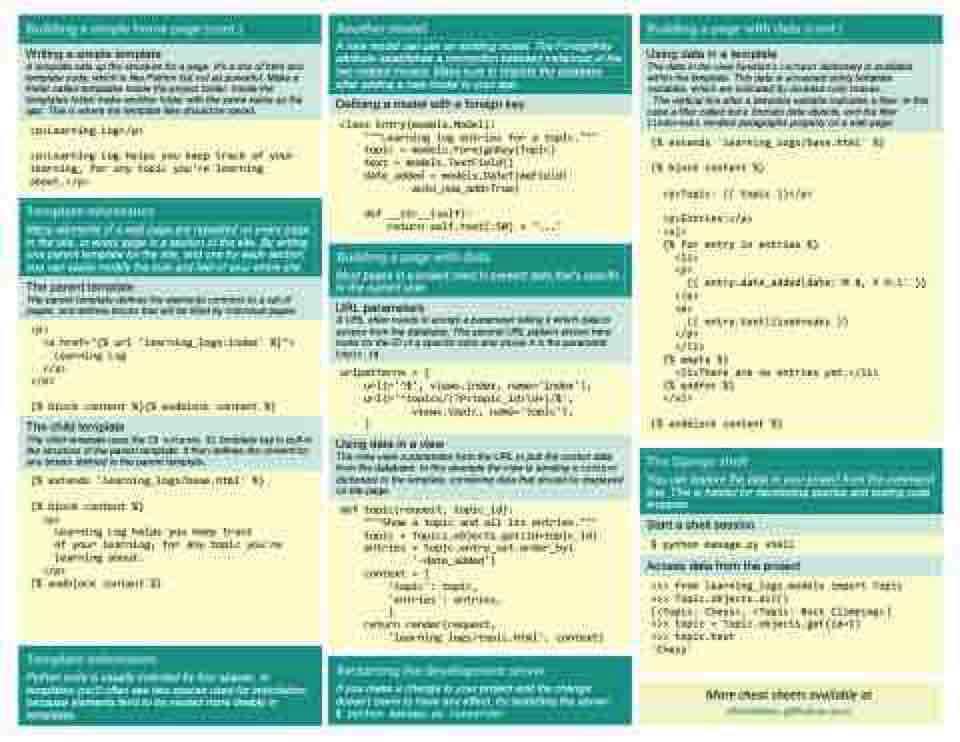
                 Writing a simple template
A template sets up the structure for a page. It’s a mix of html and template code, which is like Python but not as powerful. Make a folder called templates inside the project folder. Inside the templates folder make another folder with the same name as the app. This is where the template files should be saved.
     <p>Learning Log</p>
<p>Learning Log helps you keep track of your learning, for any topic you're learning about.</p>
         A new model can use an existing model. The ForeignKey attribute establishes a connection between instances of the two related models. Make sure to migrate the database after adding a new model to your app.
    Defining a model with a foreign key
    class Entry(models.Model):
    """Learning log entries for a topic."""
    topic = models.ForeignKey(Topic)
    text = models.TextField()
    date_added = models.DateTimeField(
            auto_now_add=True)
    def __str__(self):
        return self.text[:50] + "..."
     Most pages in a project need to present data that’s specific to the current user.
      URL parameters
A URL often needs to accept a parameter telling it which data to access from the database. The second URL pattern shown here looks for the ID of a specific topic and stores it in the parameter topic_id.
     urlpatterns = [
    url(r'^$', views.index, name='index'),
    url(r'^topics/(?P<topic_id>\d+)/$',
]
views.topic, name='topic'),
      Using data in a view
The view uses a parameter from the URL to pull the correct data from the database. In this example the view is sending a context dictionary to the template, containing data that should be displayed on the page.
     def topic(request, topic_id):
    """Show a topic and all its entries."""
    topic = Topics.objects.get(id=topic_id)
    entries = topic.entry_set.order_by(
            '-date_added')
    context = {
        'topic': topic,
        'entries': entries,
        }
    return render(request,
        'learning_logs/topic.html', context)
          Using data in a template
The data in the view function’s context dictionary is available within the template. This data is accessed using template variables, which are indicated by doubled curly braces.
The vertical line after a template variable indicates a filter. In this case a filter called date formats date objects, and the filter linebreaks renders paragraphs properly on a web page.
     {% extends 'learning_logs/base.html' %}
{% block content %}
  <p>Topic: {{ topic }}</p>
  <p>Entries:</p>
  <ul>
  {% for entry in entries %}
<li> <p>
      {{ entry.date_added|date:'M d, Y H:i' }}
    </p>
    <p>
      {{ entry.text|linebreaks }}
</p>
    </li>
  {% empty %}
    <li>There are no entries yet.</li>
  {% endfor %}
  </ul>
{% endblock content %}
            Many elements of a web page are repeated on every page
 in the site, or every page in a section of the site. By writing one parent template for the site, and one for each section, you can easily modify the look and feel of your entire site.
      The parent template
The parent template defines the elements common to a set of pages, and defines blocks that will be filled by individual pages.
    <p>
  <a href="{% url 'learning_logs:index' %}">
    Learning Log
  </a>
</p>
{% block content %}{% endblock content %}
      The child template
The child template uses the {% extends %} template tag to pull in the structure of the parent template. It then defines the content for any blocks defined in the parent template.
     {% extends 'learning_logs/base.html' %}
{% block content %}
  <p>
    Learning Log helps you keep track
    of your learning, for any topic you're
    learning about.
  </p>
{% endblock content %}
        You can explore the data in your project from the command line. This is helpful for developing queries and testing code snippets.
     Start a shell session
     $ python manage.py shell
     Access data from the project
    >>> from learning_logs.models import Topic
>>> Topic.objects.all()
[<Topic: Chess>, <Topic: Rock Climbing>]
>>> topic = Topic.objects.get(id=1)
>>> topic.text
'Chess'
             Python code is usually indented by four spaces. In templates you’ll often see two spaces used for indentation, because elements tend to be nested more deeply in templates.
 If you make a change to your project and the change doesn’t seem to have any effect, try restarting the server: $ python manage.py runserver
More cheat sheets available at
