
Page 243 - Chief Architect Reference Manual
P. 243
Editing Spline Based Objects
tribute Objects” on page 252. Only avail-
• Click the Fence Select edit button to
use the selected object(s) as a selection able when multiple objects are selected.
fence. See “Using a Fence” on page 217. • Click the Align/Distribute Along
• Click the Convert Spline to Polyline Line edit button, then click on a line-
edit button to convert the selected spline based object align the selected object(s)
into a polyline. See “Convert Spline to relative to that line. See “Align/Distribute
Polyline” on page 269. Along Line” on page 253.
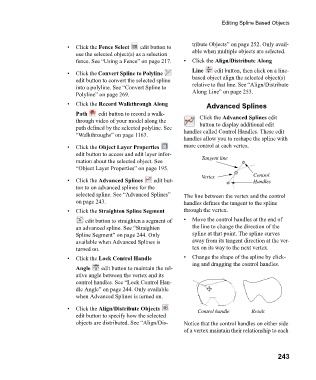
• Click the Record Walkthrough Along Advanced Splines
Path edit button to record a walk-
through video of your model along the Click the Advanced Splines edit
path defined by the selected polyline. See button to display additional edit
“Walkthroughs” on page 1163. handles called Control Handles. These edit
handles allow you to reshape the spline with
• Click the Object Layer Properties more control at each vertex.
edit button to access and edit layer infor-
mation about the selected object. See Tangent line
“Object Layer Properties” on page 195.
Vertex Control
• Click the Advanced Splines edit but- Handles
ton to on advanced splines for the
selected spline. See “Advanced Splines” The line between the vertex and the control
on page 243. handles defines the tangent to the spline
• Click the Straighten Spline Segment through the vertex.
edit button to straighten a segment of • Move the control handles at the end of
an advanced spline. See “Straighten the line to change the direction of the
Spline Segment” on page 244. Only spline at that point. The spline curves
available when Advanced Splines is away from its tangent direction at the ver-
turned on. tex on its way to the next vertex.
• C l i c k t h e Lock Control Handle • Change the shape of the spline by click-
ing and dragging the control handles.
Angle edit button to maintain the rel-
ative angle between the vertex and its
control handles. See “Lock Control Han-
dle Angle” on page 244. Only available
when Advanced Splines is turned on.
• Click the Align/Distribute Objects Control handle Result
edit button to specify how the selected
objects are distributed. See “Align/Dis- Notice that the control handles on either side
of a vertex maintain their relationship to each
243