
Page 506 - Chief Architect Reference Manual
P. 506
Chief Architect X10 Reference Manual
To determine the Height in drawing units • The Print Size button on the TEXT
that is needed to produce text of a specific panel of the Rich Text Specification
size when printed, use the Print Size dialog. See “Text Panel” on page 494.
Calculator dialog.
• The Scale button on the TEXT panel of
To use the Print Size Calculator dialog a variety of specification dialogs. See
“Text Style Panel” on page 520.
1. Select the text object or Text Style that
you wish to scale and click: • The Scale button in the Text Style
Defaults dialog.
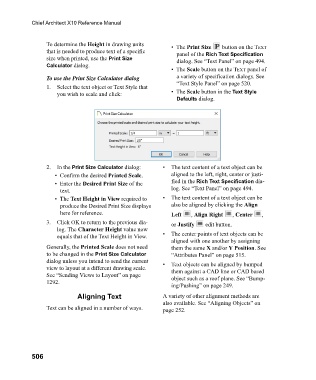
2. In the Print Size Calculator dialog: • The text content of a text object can be
• Confirm the desired Printed Scale. aligned to the left, right, center or justi-
• Enter the Desired Print Size of the fied in the Rich Text Specification dia-
text. log. See “Text Panel” on page 494.
• The Text Height in View required to • The text content of a text object can be
produce the Desired Print Size displays also be aligned by clicking the Align
here for reference. Left , Align Right , Center ,
3. Click OK to return to the previous dia- or Justify edit button.
log. The Character Height value now
equals that of the Text Height in View. • The center points of text objects can be
aligned with one another by assigning
Generally, the Printed Scale does not need them the same X and/or Y Position. See
to be changed in the Print Size Calculator “Attributes Panel” on page 515.
dialog unless you intend to send the current • Text objects can be aligned by bumped
view to layout at a different drawing scale. them against a CAD line or CAD based
See “Sending Views to Layout” on page object such as a roof plane. See “Bump-
1292.
ing/Pushing” on page 249.
Aligning Text A variety of other alignment methods are
also available. See “Aligning Objects” on
Text can be aligned in a number of ways. page 252.
506