
Page 52 - TheDecorativePainter_DP4_Winter_2018
P. 52
Skip a few inches below grass line then repeat these steps using blues and violets to create water. Again pull blues down and then up. Avoid hard edges.
Beware here. Using too much water is not always helpful. YOU DO NOT WANT A GREEN HORSE.
Stop the flow by setting up your shirt board to a near vertical position on a chair so the color will then run down away from horse or help the blue color go up by standing your horse on its head. Let completely dry.
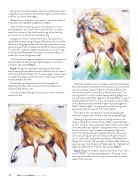
Using your 1" brush moisten the horse. The palomino is mostly blond tones using Antique Gold with brush-mix Ultra White in the highlight areas. I like to really water down these colors and get them to bleed into the Burnt Sienna shadows. Try to brush-sculpt the large muscles and curves of his legs and back side. Remember the lesson of cylinder effect to create the curve of legs and neck?
Darkest value at edges and lightness in center creates the cylinder effect (makes something flat appear round like a cylinder). See sample Step 2.
Step 3: Using the watercolor technique as described above, spray the area above horse’s head and into his mane with thinned Bright Yellow. This “sunshine glow” helps create a wonderful background for the mane. Use Antique Gold in shadow areas to the left.
Mane layers are separated with lines (triangles) of Mediterranean Blue, Burnt Sienna, Dark Chocolate and Antique Gold. Allow to dry.
Let’s do the face! Being the focal point, I want maximum attention here.
STEP 3
STEP 2
Reinstate shadow areas in triangles under chin and side of face. My sample uses purple as the shadow but if you prefer you can use blue. Eyes are filled in with Lamp Black, then with my liner brush I used a Burnt Sienna semi-circle “iris” running from 11 to 3 (on a clock face guide). Highlight the iris at 9 and 4 with Bright Yellow. Float Lamp Black on top of eyeball under lid from 9 to 3 to sink eyeball into skull. Allow to dry. Repeat steps if needed. Keep the pupils large and black. “Spark of light” is a series of three dots using small stylus and white on pupil at 3-2-1 area (clock).
Think about the roundness of cornea and place light reflection (spark) a bit off center but not at eyeball edge.
Keeping in mind the direction of the light source, use Antique Gold, Burnt Sienna, Bright Yellow and Ultra White to fill in the face. Draw upper and lower eyelid in with white. Use Lamp Black as neighbor “comparative value” and add broken outline to “pop” creases that separate highs and
lows of the facial bones and eyelids. Detail fur areas were done using Antique Gold over Dioxazine Purple. Inside of nose is quite dark using browns and black. Add Dioxazine Purple mid-tone for soft nose skin and Navy Blue shadow to separate nose from Dioxazine Purple upper lip. Highlight left edge with Ultra White. Perfect! See sample Step 3.
Step 4: Beginner students tend to start here. “NO, NO.... halt HORSIE.” I call this step adding the “frosting” to the painting. Like a cake, the frosting comes on over a cooled cake, at the very end.
50 TheDecorativePainter • WINTER 2018
