
Page 64 - BBC Sky at Night Beginners Guide to Astronomy - 2017 UK
P. 64
WHAT TO USE
START SHOOTING Learn how to capture the heavens
PROJECT 1
TWILIGHT SCENES
This is a great way to start your astrophotography
journey. Look for a composition that includes a twilight
sky, a low crescent Moon, and maybe even a planet
or two. You’ll get a better picture if you can frame the
shot with some trees or buildings that will silhouette
themselves against the sky.
If you have a DSLR, set it to manual so you can vary
the results. Fix it to your tripod and open the camera’s
lens as wide as it will go (called a wide aperture).
Focus at infi nity and use different exposure times (vary
how long the shutter stays open for). If you don’t have
a DSLR and your camera is of the point-and-click
variety, try it anyway – the results could be surprising.
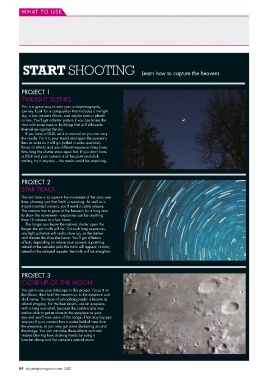
PROJECT 2
STAR TRAILS
The aim here is to capture the movement of the stars over
time, showing you that Earth is spinning. As well as a
tripod-mounted camera, you’ll need a cable release.
The camera has to gaze at the heavens for a long time
to show the movement – exposures can be anything
from 15 minutes to a few hours.
The longer you leave the camera shutter open the
longer the star trails will be. On such long exposures,
any light pollution will really show up, so the darker
and clearer the skies the better. You’ll get different
effects depending on where your camera is pointing:
aimed at the celestial pole the trails will appear circular;
aimed at the celestial equator the trails will be straighter.
PROJECT 3
CLOSE-UP OF THE MOON
You get to use your telescope in this project. Focus it on
the Moon, then hold the camera up to the eyepiece and
click away. This type of astrophotography is known as
afocal imaging. For the best results, use an eyepiece
with a long eye-relief, because the camera lens may
not be able to get as close to the eyepiece as your
eye and you’ll miss some of the image. That may happen
anyway if your camera has a wider fi eld of view than
the eyepiece, so you may get some darkening around
the image. You can minimise these effects and also
reduce blurring from shaking hands by using a
bracket clamp and the camera’s optical zoom.
64 skyatnightmagazine.com 2012