
Page 28 - November 2017
P. 28
There are a number of scribing templates produced
by aftermarket modeling companies. For tightly
curved surfaces such as the fuselage, you can use
label making tape like that made by Dymo. It will
contour to the surface while being thick enough to
act as a guide to your scribing tool.
Scribing Surface Details
Usually the first step when scribing a plastic airplane
This tutorial model is to make smooth the parts to be scribed.
explains how to You can start by shaving off as much detail as
replace raised possible with a dull hobby knife (a sharp blade
details with increases the chance of gauging into the surface).
scribed lines. Prior After shaving, finish the removal by lightly wet
to about twenty- sanding with fine sandpaper (800-grit or finer). After
five years ago, the sanding and shaving, it is often possible to still see
typical plastic the faint remnants of the original panel lines making
model airplane kit had unrealistic-looking raised panel then useful as a guide to scribe the recessed details.
lines or countless rows of rivet heads covering the Make sure that your parts do not move while
model’s surface. This is because it was too expensive scribing. Secure them with tape onto a cutting pad
to develop the steel injection molding tools that could and support contoured parts so that they are not
simulate recessed panel lines. During the late 1980’s depressed during scribing. How deeply to scribe is a
we started to see models with more realistic-looking matter of preference and experience. Do you want
recessed panel lines. This was due to advances in the the scribed surface details to dominate the finished
mold-cutting techniques that made it made it possible model or do you want them to be a subtle detail?
to economically develop steel molds with the raised
You will notice that scribing plastic creates a ridged
details necessary to create the recessed features in the
injection molded plastic parts. However, many kits groove. To achieve the illusion of clean, fully
recessed panel lines, these ridges need to be
made from older injection molds are still on the
removed. Ridges can be removed by more wet
market today and some newer kits have some raised
features that would look much more realistic when sanding. Sanding will tend to fill the scribed lines
with wet dust. This can be removed by scrubbing in
converted to recessed features.
soap and water.
There are many reasons to convert to recessed panel
lines and details. A big advantage of recessed features
is that they can receive a light wash to show
weathering as part of the finishing coats. Also, kits
rarely assemble so that opposing parts align perfectly.
Panel lines often have to be removed and re-scribed.
Lastly, a high gloss finish will highlight surface detail
making recessed lines much more desirable.
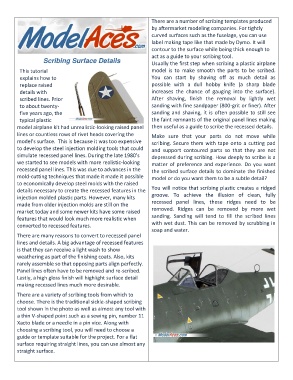
There are a variety of scribing tools from which to
choose. There is the traditional sickle-shaped scribing
tool shown in the photo as well as almost any tool with
a thin V-shaped point such as a sewing pin, number 11
Xacto blade or a needle in a pin vice. Along with
choosing a scribing tool, you will need to choose a
guide or template suitable for the project. For a flat
surface requiring straight lines, you can use almost any
straight surface.