Page 15 - Merry Barbara "Marlinspike Sailor's Knots and Crafts"
P. 15

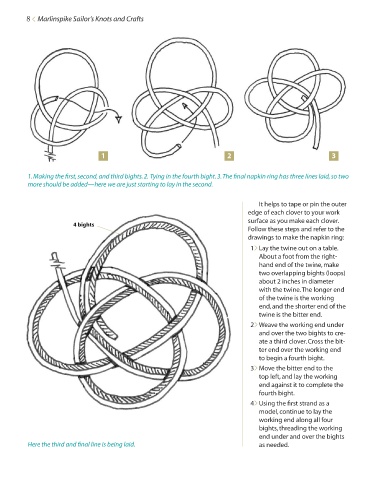
8 < Marlinspike Sailor’s Knots and Crafts


                                        1                                        2                                 3


                1. Making the first, second, and third bights. 2. Tying in the fourth bight. 3. The final napkin ring has three lines laid, so two
                more should be added—here we are just starting to lay in the second.


                                                                                            It helps to tape or pin the outer
                                                                                        edge of each clover to your work
                                                                                        surface as you make each clover.
                               4 bights
                                                                                        Follow these steps and refer to the
                                                                                        drawings to make the napkin ring:
                                                                                          1 > Lay the twine out on a table.
                                                                                            About a foot from the right-
                                                                                            hand end of the twine, make
                                                                                            two overlapping bights (loops)
                                                                                            about 2 inches in diameter
                                                                                            with the twine. The longer end
                                                                                            of the twine is the working
                                                                                            end, and the shorter end of the
                                                                                            twine is the bitter end.
                                                                                          2 > Weave the working end under
                                                                                            and over the two bights to cre-
                                                                                            ate a third clover. Cross the bit-
                                                                                            ter end over the working end
                                                                                            to begin a fourth bight.
                                                                                          3 > Move the bitter end to the
                                                                                            top left, and lay the working
                                                                                            end against it to complete the
                                                                                            fourth bight.
                                                                                          4 > Using the first strand as a
                                                                                            model, continue to lay the
                                                                                            working end along all four
                                                                                            bights, threading the working
                                                                                            end under and over the bights
                 Here the third and final line is being laid.                               as needed.
   10   11   12   13   14   15   16   17   18   19   20