
Page 367 - Fluid, Electrolyte, and Acid-Base Disorders in Small Animal Practice
P. 367
Technical Aspects of Fluid Therapy 357
PERCUTANEOUS by its “wings” in your dominant hand. To prevent
CATHETERIZATION fluid from draining out of the system, hold the
tubing coiled in the same hand, with the Luer adapter
end held level with the needle tip.
WINGED NEEDLE CATHETERS 4. After an assistant occludes the vein, tense the skin
Materials Needed slightly with the opposite hand to stabilize. Do not
touch the needle shaft or the skin at the intended
1. Appropriate catheter
point of insertion.
2. Two clean latex examination gloves
5. Hold the catheter by the plastic wing(s) with the
3. One roll of 1-inch white tape
bevel facing up, and push it through the skin and into
4. One catheter injection cap, intravenous tubing set,
the vein. There are two technique options:
syringe filled with drug or intravenous solution,
catheter “T” piece, or other needleless injection site a. Direct puncture: Visualize the vein, and position
device (e.g., Interlink connectors, Baxter Healthcare, the needle tip directly over it, pointed in the direc-
Deerfield, Ill.; CLAVE or CLC 2000 connectors, ICU tion of blood flow. While holding the needle at a
Medical, San Clemente, Calif.; Abbott Laboratories, 30-degree angle with respect to the long axis of
the vein, advance the needle through the skin
Abbott Park, Ill.) (Figure 15-1)
and vessel wall in a single rapid motion.
5. Single dose of povidone-iodine ointment applied on a
b. Indirect method: Visualize the vein, and pene-
sterile gauze sponge (if the needle is to remain in place
trate the skin on either side (but not directly over)
unobserved)
of it. Push the needle through the skin at a
Procedure 45-degree angle, and advance it subcutaneously
for 0.5 cm (¼ inch) parallel to the vein. At that
1. Because this device is intended for short infusions
point, redirect the needle at a shallower angle into
and because the stainless steel needle may be less
the vein.
likely to drag surface contamination into the wound,
6. Blood flows into the catheter tubing when the vein is
skin preparation may be minimal. Although not
entered. Advance the needle fully into the vein. Lift
essential, clipping the hair at the injection site
facilitates visualization of the vein for needle place- the needle slightly as it is advanced, a technique that
ment. Whether the coat is clipped, wipe the area once is important for any venipuncture, to minimize the
risk of penetrating the vessel wall (Figure 15-2).
with alcohol-soaked cotton balls or gauze to remove
7. The assistant should immediately release the pressure
dander and flatten the coat.
on the vein.
2. Wash your hands, and put on clean examination
8. Attach the syringe with drug solution or intravenous
gloves.
fluid to the tubing, and fill the catheter with solution.
3. Flush the catheter with intravenous fluid or drug
solution to purge air from the system. Disconnect Alternatively, an intravenous fluid line may be
the syringe from the tubing, and hold the catheter attached if immediate fluid administration is desired.
Examine the skin near the end of the catheter for any
evidence of extravasation at the start of the infusion.
Figure 15-2 Technique for placement of a needle into a
superficial vein. Once the vein has been entered, the bevel remains
oriented toward the skin, and the shaft of the needle is lifted up
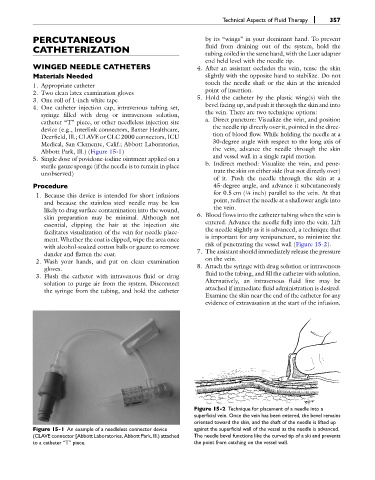
Figure 15-1 An example of a needleless connector device against the superficial wall of the vessel as the needle is advanced.
(CLAVE connector [Abbott Laboratories, Abbott Park, Ill.) attached The needle bevel functions like the curved tip of a ski and prevents
to a catheter “T” piece. the point from catching on the vessel wall.