
Page 3160 - Cote clinical veterinary advisor dogs and cats 4th
P. 3160
5. Repeat this “weaving” process with the second and third square
holes (and their underlying strips) to fasten the edges of the
E-collar together at three points and make a solid, firm cone.
6. To make loops for the gauze ribbon or lace that will hold the
VetBooks.ir small tabs toward the convex surface of the collar, and push
E-collar in place around the neck: curl each of the three or four
each one first through the bottom slit (pointing it to the concave
surface of the collar) and then back out through the second slit.
PROCEDURE: PLACING THE E-COLLAR ON YOUR PET
1. This procedure assumes the E-collar is already assembled,
meaning it is cone or dish shaped. If it is not (i.e., it is a flat
sheet of plastic), see above for assembly.
2. Sit or stand beside your dog or cat. For a right-handed person,
be on the pet’s left side. Both of you should be facing in the
same direction, meaning the pet is along your right thigh. Face to
face does not give you control and challenges the pet to escape.
3. Pick up the E-collar by the edge, at the large end of the cone,
with your left hand.
4. Reach around with your right hand to the right side of the pet’s
head, and hold the side of the head (cats, small dogs) or the
side of muzzle (larger dogs).
5. Guide the nose and head through the smaller end of the E-collar
as you slide the cone to sit in place, past the ears and around
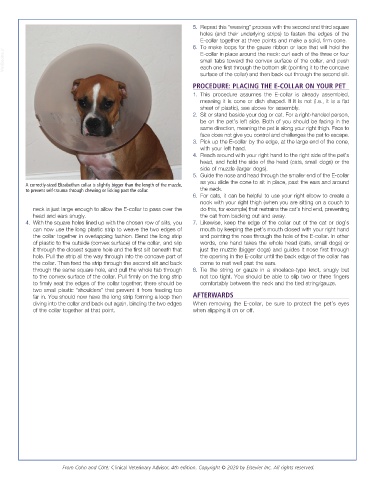
A correctly-sized Elizabethan collar is slightly bigger than the length of the muzzle,
to prevent self-trauma through chewing or licking past the collar. the neck.
6. For cats, it can be helpful to use your right elbow to create a
nook with your right thigh (when you are sitting on a couch to
neck is just large enough to allow the E-collar to pass over the do this, for example) that restrains the cat’s hind end, preventing
head and ears snugly. the cat from backing out and away.
4. With the square holes lined up with the chosen row of slits, you 7. Likewise, keep the edge of the collar out of the cat or dog’s
can now use the long plastic strip to weave the two edges of mouth by keeping the pet’s mouth closed with your right hand
the collar together in overlapping fashion. Bend the long strip and pointing the nose through the hole of the E-collar. In other
of plastic to the outside (convex surface) of the collar, and slip words, one hand takes the whole head (cats, small dogs) or
it through the closest square hole and the first slit beneath that just the muzzle (bigger dogs) and guides it nose first through
hole. Pull the strip all the way through into the concave part of the opening in the E-collar until the back edge of the collar has
the collar. Then feed the strip through the second slit and back come to rest well past the ears.
through the same square hole, and pull the whole tab through 8. Tie the string or gauze in a shoelace-type knot, snugly but
to the convex surface of the collar. Pull firmly on the long strip not too tight. You should be able to slip two or three fingers
to firmly seat the edges of the collar together; there should be comfortably between the neck and the tied string/gauze.
two small plastic “shoulders” that prevent it from feeding too
far in. You should now have the long strip forming a loop then AFTERWARDS
diving into the collar and back out again, binding the two edges When removing the E-collar, be sure to protect the pet’s eyes
of the collar together at that point. when slipping it on or off.
From Cohn and Côté: Clinical Veterinary Advisor, 4th edition. Copyright © 2020 by Elsevier Inc. All rights reserved.