
Page 1173 - Adams and Stashak's Lameness in Horses, 7th Edition
P. 1173
Foot Care and Farriery 1139
(Figure 11.57). The WPOTF is generally below the center Foot with distortions - before trimming
of articulation (±1/4 inch), depending on the angle of the
VetBooks.ir “before trim” heels is shorter than the distance from
distal phalanx. If the distance from the WPOTF to the
5
the WPOTF to the “before trim” point of break‐over,
then there are most likely hoof capsule distortions that
can negatively affect the performance and soundness of
the horse (Figure 11.57). Changing the ground surface
ratios around the WPOTF or center of the foot so that
there is equal or slightly more mass behind the WPOTF
has been shown to improve the function of the foot and
soundness of the horse.
Again, the ELPO has taken the lead in developing the
mapping protocol further to help improve accuracy and
consistency. Functional sole plane
NATURAL BALANCE BAREFOOT TRIMMING
The following natural balance hoof trimming proce
dure is used only on horses that will be left barefoot. The
hoof preparation protocols for horses that are to be
shod are slightly different and will be covered later.
Once the foot is exfoliated and mapped, it is time to
trim the hoof wall to eliminate any distortions and
achieve D/P and M/L balance. Begin by trimming the
back two‐thirds of the foot. Start just behind the toe
quarter (pillar) region and follow the contour of the
exfoliated sole, staying about 1/8 to 1/4 inch above the
line of the sole (Figure 11.60). Next, trim the wall
around the toe. Again, start behind the pillar and cut
from one toe quarter around the toe to the other toe 10–15° Slight
quarter. Stay at least 1/8 inch above the level of the sole frog contact
all the way around the toe. After trimming
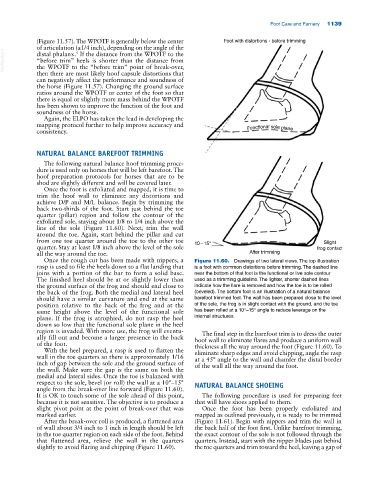
Once the rough cut has been made with nippers, a Figure 11.60. Drawings of two lateral views. The top illustration
rasp is used to file the heels down to a flat landing that is a foot with common distortions before trimming. The dashed line
joins with a portion of the bar to form a solid base. near the bottom of that foot is the functional or live sole contour
The finished heel should be at or slightly lower than used as a trimming guideline. The lighter, shorter dashed lines
the ground surface of the frog and should end close to indicate how the flare is removed and how the toe is to be rolled
the back of the frog. Both the medial and lateral heel (beveled). The bottom foot is an illustration of a natural balance
should have a similar curvature and end at the same barefoot trimmed foot. The wall has been prepared close to the level
position relative to the back of the frog and at the of the sole, the frog is in slight contact with the ground, and the toe
same height above the level of the functional sole has been rolled at a 10°–15° angle to reduce leverage on the
plane. If the frog is atrophied, do not rasp the heel internal structures.
down so low that the functional sole plane in the heel
region is invaded. With more use, the frog will eventu The final step in the barefoot trim is to dress the outer
ally fill out and become a larger presence in the back hoof wall to eliminate flares and produce a uniform wall
of the foot. thickness all the way around the foot (Figure 11.60). To
With the heel prepared, a rasp is used to flatten the eliminate sharp edges and avoid chipping, angle the rasp
wall in the toe quarters so there is approximately 1/16 at a 45° angle to the wall and chamfer the distal border
inch of gap between the sole and the ground surface of of the wall all the way around the foot.
the wall. Make sure the gap is the same on both the
medial and lateral sides. Once the toe is balanced with
respect to the sole, bevel (or roll) the wall at a 10°–15° NATURAL BALANCE SHOEING
angle from the break‐over line forward (Figure 11.60).
It is OK to touch some of the sole ahead of this point, The following procedure is used for preparing feet
because it is not sensitive. The objective is to produce a that will have shoes applied to them.
slight pivot point at the point of break‐over that was Once the foot has been properly exfoliated and
marked earlier. mapped as outlined previously, it is ready to be trimmed
After the break‐over roll is produced, a flattened area (Figure 11.61). Begin with nippers and trim the wall in
of wall about 3/4 inch to 1 inch in length should be left the back half of the foot first. Unlike barefoot trimming,
in the toe quarter region on each side of the foot. Behind the exact contour of the sole is not followed through the
that flattened area, relieve the wall in the quarters quarters. Instead, start with the nipper blades just behind
slightly to avoid flaring and chipping (Figure 11.60). the toe quarters and trim toward the heel, leaving a gap of