
Page 178 - Casting of Angels- Dave Parvin
P. 178
174
Making a Pressure
Chamber
By David E. Parvin, A.L.I.
his is the third in a series of four articles about
T constructing and using both vacuum and pressure
chambers to achieve castings that are bubble free
and with greater detail. The first article explained
the "why" and the second told how to make a low cost yet
very functional vacuum vessel. This one will describe how
to assemble a similar pressure chamber. In next month's
"Sculpture Journal," I will show how to use both of these to
achieve some results that would be impossible without
them.
In last month's article, I explained that to make a
vacuum chamber one had to find a suitable container,
fabricate an airtight transparent lid, attach the right fittings,
and provide a vacuum source. The great news is that a
pressure chamber, tank, vessel, or pot is much simpler to
come by. Our friends in the painting industry have done most
of the work for us by providing pressure paint tanks in all
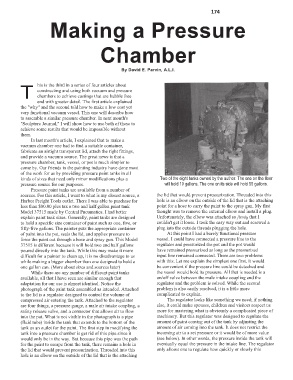
kinds of sizes that need only minor modifications plus a Two of the eight tanks owned by the author. The one on the floor
pressure source for our purposes. will hold 10 gallons. The one on its side will hold 55 gallons.
Pressure paint tanks are available from a number of
sources. For this article, I went to what is my closest source, a the lid that would prevent pressurization. Threaded into this
Harbor Freight Tools outlet. There I was able to purchase for hole is an elbow on the outside of the lid that is the attaching
less than $80.00 plus tax a two and half gallon paint tank point for a hose to carry the paint to the spray gun. My first
Model 37515 made by Central Pneumatics. I had better thought was to remove the external elbow and install a plug.
explain paint tank sizes. Generally, paint tanks are designed Unfortunately, the elbow was attached so firmly that I
to hold a specific size container of paint such as one, five, or couldn't get it loose. I took the easy way out and screwed a
fifty-five gallons. The painter puts the appropriate container plug into the outside threads plugging the hole.
of paint into the pot, seals the lid, and applies pressure to At this point I had a barely functional pressure
force the paint out through a hose and spray gun. This Model vessel. I could have connected a pressure line to the
37515 is different because it will hold two and half gallons regulator and pressurized the pot and the pot would
poured directly into the tank. While this may make it more have remained pressurized as long as the pressurized
difficult for a painter to clean up, it is no disadvantage to us input line remained connected. There are two problems
while making a bigger chamber than one designed to hold a with this. Let me explain the simplest one first. It would
one gallon can. (More about sizes and sources later) be convenient if the pressure line could be detached and
While there are any number of different paint tanks the vessel would hold its pressure. All that is needed is a
available, all that I have seen are similar enough that on/off valve between the male intake coupling and the
adaptation for our use is almost identical. Notice the regulator and the problem is solved. While the second
photograph of the paint tank assembled as intended. Attached problem is also easily resolved, it is a little more
to the lid is a regulator designed to control the volume of complicated to explain.
compressed air entering the tank. Attached to the regulator The regulator looks like something we need; if nothing
are four things, a pressure gauge, a male air intake coupling, a else, it could make spouses, children and visitors respect us
safety release valve, and a connector that allows air to flow more for mastering what is obviously a complicated piece of
into the pot. What is not visible in the photograph is a pipe machinery. But this regulator was designed to regulate the
(fluid tube) inside the tank that extends to the bottom of the amount of paint coming out of the tank by adjusting the
tank as an outlet for the paint. The first step in modifying the amount of air coming into the tank. It does not restrict the
tank into a pressure chamber is get rid of this pipe since it incoming air to a set pressure or it would be of more value
would only be in the way. But because this pipe was the path (see below). In other words, the pressure inside the tank will
for the paint to escape from the tank, there remains a hole in eventually equal the pressure in the intake line. The regulator
the lid that would prevent pressurization. Threaded into this only allows one to regulate how quickly or slowly this
hole is an elbow on the outside of the lid that is the attaching