
Page 93 - 233423 - Exhaust Fans_Neat
P. 93
Assembly and Installation of 24” Overhead Support Bar (1)
For use with ALL Vent-A-Kiln model numbers:
1227, 1332, 1437, 1544
2
1
8
9 12 11
Utilize With Models: 1227, 1332,
1437 & 1544
5 13
6
(Model: 1544 Only)
10
3 3
7 Top View
(Cable (4) Not Shown This View Only)
2
2 3
4 6 (Pulley
Should NOT Rotate) 5
7 5
Front View 9 8
1 (Fully Assembled) Side View
4
4
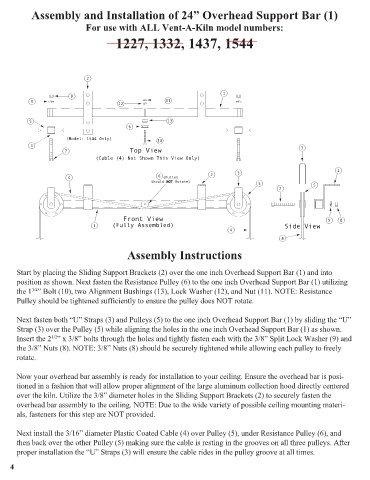
Assembly Instructions
Start by placing the Sliding Support Brackets (2) over the one inch Overhead Support Bar (1) and into
position as shown. Next fasten the Resistance Pulley (6) to the one inch Overhead Support Bar (1) utilizing
the 1 ” Bolt (10), two Alignment Bushings (13), Lock Washer (12), and Nut (11). NOTE: Resistance
3/4
Pulley should be tightened sufficiently to ensure the pulley does NOT rotate.
Next fasten both “U” Straps (3) and Pulleys (5) to the one inch Overhead Support Bar (1) by sliding the “U”
Strap (3) over the Pulley (5) while aligning the holes in the one inch Overhead Support Bar (1) as shown.
Insert the 2 ” x 3/8” bolts through the holes and tightly fasten each with the 3/8” Split Lock Washer (9) and
1/2
the 3/8” Nuts (8). NOTE: 3/8” Nuts (8) should be securely tightened while allowing each pulley to freely
rotate.
Now your overhead bar assembly is ready for installation to your ceiling. Ensure the overhead bar is posi-
tioned in a fashion that will allow proper alignment of the large aluminum collection hood directly centered
over the kiln. Utilize the 3/8” diameter holes in the Sliding Support Brackets (2) to securely fasten the
overhead bar assembly to the ceiling. NOTE: Due to the wide variety of possible ceiling mounting materi-
als, fasteners for this step are NOT provided.
Next install the 3/16” diameter Plastic Coated Cable (4) over Pulley (5), under Resistance Pulley (6), and
then back over the other Pulley (5) making sure the cable is resting in the grooves on all three pulleys. After
proper installation the “U” Straps (3) will ensure the cable rides in the pulley groove at all times.
4