Page 277 - Mold Bases & Plates 2020
P. 277
Technical Reference
    284

                                Tables for Determining Metric Tolerances


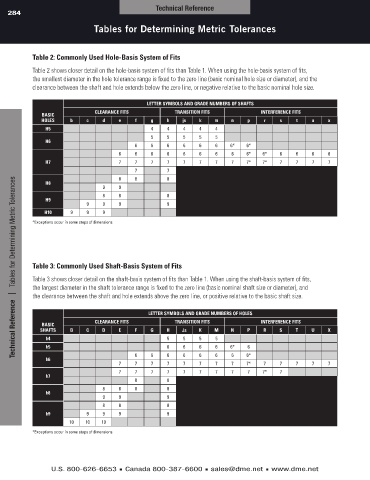
            Table 2: Commonly used hole-basis system of fits

            Table 2 shows closer detail on the hole-basis system of fits than Table 1. When using the hole-basis system of fits,
            the smallest diameter in the hole tolerance range is fixed to the zero line (basic nominal hole size or diameter), and the
            clearance between the shaft and hole extends below the zero line, or negative relative to the basic nominal hole size.


                                                  leTTer symbols and grade numbers of shafTs
                                ClearanCe fiTs             TransiTion fiTs             inTerferenCe fiTs
               basiC
               holes    b     c    d    e     f    g    h    js    k    m     n    p    r     s    t    u     x
                h5                                 4    4     4    4    4
                                                   5    5     5    5    5
                h6
                                              6    6    6     6    6    6    6*    6*
                                        6     6    6    6     6    6    6     6    6*   6*    6    6    6     6
                h7                      7     7    7    7     7    7    7     7    7*   7*    7    7    7     7
                                              7         7
                                        8     8         8
      Technical Reference   |    Tables for Determining Metric Tolerances
                h8
                                   9    9
                                   8    8               8
                h9
                              9    9    9               9
                h10     9     9    9
            *exceptions occur in some steps of dimensions.


            Table 3: Commonly used shaft-basis system of fits

            Table 3 shows closer detail on the shaft-basis system of fits than Table 1. When using the shaft-basis system of fits,
            the largest diameter in the shaft tolerance range is fixed to the zero line (basic nominal shaft size or diameter), and
            the clearance between the shaft and hole extends above the zero line, or positive relative to the basic shaft size.


                                                  leTTer symbols and grade numbers of holes
                                ClearanCe fiTs             TransiTion fiTs             inTerferenCe fiTs
               basiC
              shafTs    b     C    d    e     f    g    h    js    k    m    n     p    r     s    T    u    x
                h4                                      5     5    5    5
                h5                                      6     6    6    6    6*    6
                                              6    6    6     6    6    6     6    6*
                h6
                                        7     7    7    7     7    7    7     7    7*   7     7    7    7     7
                                        7     7    7    7     7    7    7     7    7    7*    7
                h7
                                              8         8
                                   8    8     8         8
                h8
                                   9    9               9
                                   8    8               8
                h9            9    9    9               9
                        10   10    10
            *exceptions occur in some steps of dimensions.


                  U.S. 800-626-6653  ■  Canada 800-387-6600  ■ sales@dme.net  ■ www.dme.net

