
Page 2 - Colder Products Company - DrumQuik Pro System Installation Guide
P. 2
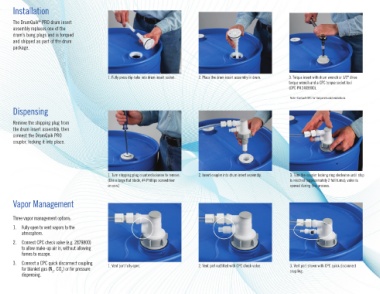
Installation


      The DrumQuik  PRO drum insert
                 ®
      assembly replaces one of the
      drum’s bung plugs and is torqued
      and shipped as part of the drum
      package.


                                              1. Fully press dip-tube into drum insert socket.  2. Place the drum insert assembly in drum.  3. Torque insert with drum wrench or 1/2" drive
                                                                                                                          torque wrench and a CPC torque socket tool
                                                                                                                          (CPC PN 2408900).

                                                                                                                          Note: Contact CPC for torque recommendations.

      Dispensing

      Remove the shipping plug from
      the drum insert assembly, then
      connect the DrumQuik PRO
      coupler, locking it into place.


                                              1. Turn shipping plug counterclockwise to remove.   2. Insert coupler into drum insert assembly.  3. Turn the coupler locking ring clockwise until stop
                                              (Use a large flat blade, #4 Phillips screwdriver                            is reached (approximately 2 full turns); valve is
                                              or coin.)                                                                   opened during this process.


      Vapor Management


      Three vapor management options:
      1.  Fully open to vent vapors to the
          atmosphere.
      2.  Connect CPC check valve (e.g. 2879800)
          to allow make-up air in, without allowing
          fumes to escape.

      3.  Connect a CPC quick disconnect coupling   1. Vent port fully open.        2. Vent port outfitted with CPC check valve.  3. Vent port shown with CPC quick disconnect
          for blanket gas (N , CO ) or for pressure                                                                       coupling.
                           2
                       2
          dispensing.