


Page 425 - Brass, Composite and Thermoplastic Fittings and Valves
P. 425
Catalog 3501E


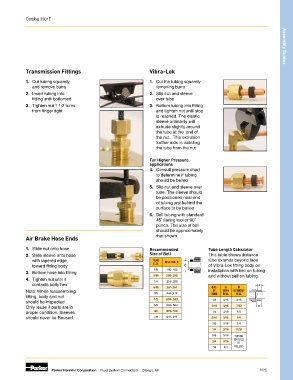
            Transmission Fittings                               Vibra-Lok                                              Assembly Guides

            1.  Cut tubing squarely                             1.  Cut the tubing squarely
               and remove burrs                                   removing burrs
            2.  Insert tubing into                              2.  Slip nut and sleeve
               fitting until bottomed                             over tube
            3.  Tighten nut 1 1/2 turns                         3.  Bottom tubing into fitting
               from finger tight                                  and tighten nut until stop
                                                                  is reached. The elastic
                                                                  sleeve ordinarily will
                                                                  extrude slightly around
                                                                  the tube at the  end of
                                                                  the nut.  This extrusion
                                                                  further aids in isolating
                                                                  the tube from the nut.

                                                                For Higher Pressure
                                                                applications
                                                                4.  Consult pressure chart
                                                                  to determine if tubing
                                                                  should be belled
                                                                5.  Slip nut and sleeve over
                                                                  tube. The sleeve should
                                                                  be positioned near end
                                                                  of tubing just behind the
                                                                  surface to be belled
                                                                6.  Bell tubing with standard
                                                                  45˚ flaring tool or 90˚
                                                                  punch. The size of bell
                                                                  should be approximately
            Air Brake Hose Ends                                   that shown.

            1.  Slide nut onto hose                             Recommended             Tube Length Calculator
            2.  Slide sleeve onto hose                          Size of Bell            This table shows distance
               with tapered edge                                 TUBE   BELL DIA. C     tube extends beyond face
               toward fitting body                               O.D.                   of Vibra-Lok fitting body on
                                                                 1/8  .190-.160         installation with bell on tubing
            3.  Bottom hose into fitting
                                                                 3/16  .255-.225        and without bell on tubing.
            4.  Tighten nut until it                             1/4  .318-.288
               contacts body hex
                                                                 5/16  .381-.351         O.D.  A     B
            Note: When reassembling                              3/8  .444-.414           OF  WITH  WITHOUT
            fitting, body and nut                                                        TUBE  BELL  BELL
            should be inspected.                                 1/2  .569-.539           1/8  3/16  3/16
            Only reuse if parts are in                           5/8  .694-.664          3/16  3/16  7/32
            proper condition. Sleeves                            3/4  .819-.789           1/4  3/16  1/4
            should never be Reused.                              7/8  .944-.914          5/16  3/16  1/4
                                                                                          3/8  3/16  1/4
                                                                                          1/2  3/16  11/32
                                                                                          5/8  3/16  TUBING
                                                                                                   SHOULD
                                                                                          3/4  3/16
                                                                                                    BE
                                                                                          7/8  1/4  BELLED


                       Parker Hannifin Corporation  |  Fluid System Connectors  |  Otsego, MI                 N25

