
Page 61 - Wood Review Dec 202 Full issue
P. 61
56
WOODTURNING
9 10
To hollow the interior I used a combination of gouges and scrapers, regularly using my ‘finger gauge’ to ensure the interior matched the exterior form without making the walls too thin or thick. There are a number of gauges available to give you visual reference of wall thickness, so it’s a matter of making use of tools and accessories that best suit your working methods and skills. The rim at the top of the box was turned down to about 3mm before the interior was sanded smooth (photo 4).
Sanding from 120 grit up to 320 I then applied a friction based finish to the interior. In photo 5 you can see how figuring within wood suddenly leaps to the fore, however it is important to not apply a ‘finish’ to the tenon yet as it may change its size before the lid is cut to match, leading to an ill-fitting match once the box is completed.
To finalise the outer shape of the box I mounted wood set aside for the lid in a scroll chuck via the tenon cut earlier.
A tenon cut into this piece serves two purposes, a carrier
for now and lid later, with grain that aligns from top to
base. Using vernier calipers to determine the exact opening required for a jamb fit chuck (photo 6), the base could now be pushed firmly into place (photo 7) and the base turned to the final shape and sanded through to 320 grit (photo 8).
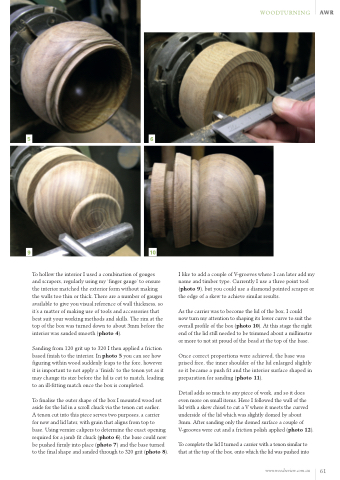
I like to add a couple of V-grooves where I can later add my name and timber type. Currently I use a three point tool (photo 9), but you could use a diamond pointed scraper or the edge of a skew to achieve similar results.
As the carrier was to become the lid of the box, I could now turn my attention to shaping its lower curve to suit the overall profile of the box (photo 10). At this stage the right end of the lid still needed to be trimmed about a millimetre or more to not sit proud of the bead at the top of the base.
Once correct proportions were achieved, the base was prised free, the inner shoulder of the lid enlarged slightly so it became a push fit and the interior surface shaped in preparation for sanding (photo 11).
Detail adds so much to any piece of work, and so it does even more on small items. Here I followed the wall of the
lid with a skew chisel to cut a V where it meets the curved underside of the lid which was slightly domed by about 3mm. After sanding only the domed surface a couple of V-grooves were cut and a friction polish applied (photo 12).
To complete the lid I turned a carrier with a tenon similar to that at the top of the box, onto which the lid was pushed into
www.woodreview.com.au 61
