
Page 38 - DP Vol 21 No1_Neat
P. 38
RESTORATIVE DENTISTRY SECTION
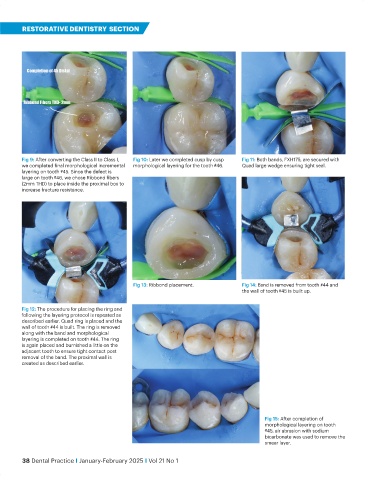
Fig 9: After converting the Class II to Class I, Fig 10: Later we completed cusp by cusp Fig 11: Both bands, FXH175, are secured with
we completed final morphological incremental morphological layering for the tooth #46. Quad large wedge ensuring tight seal.
layering on tooth #45. Since the defect is
large on tooth #46, we chose Ribbond fibers
(2mm THD) to place inside the proximal box to
increase fracture resistance.
Fig 13: Ribbond placement. Fig 14: Band is removed from tooth #44 and
the wall of tooth #45 is built up.
Fig 12: The procedure for placing the ring and
following the layering protocol is repeated as
described earlier. Quad ring is placed and the
wall of tooth #44 is built. The ring is removed
along with the band and morphological
layering is completed on tooth #44. The ring
is again placed and burnished a little on the
adjacent tooth to ensure tight contact post
removal of the band. The proximal wall is
created as described earlier.
Fig 15: After completion of
morphological layering on tooth
#45, air abrasion with sodium
bicarbonate was used to remove the
smear layer.
38 Dental Practice I January-February 2025 I Vol 21 No 1