
Page 32 - Des Pawson "Des Pawson's Knot Craft" 2 edit.
P. 32
KNOTCRAFT 2009:Layout 1 23/10/09 12:17 Page 31
SIDE FENDER USING THE CR O WN SENNIT
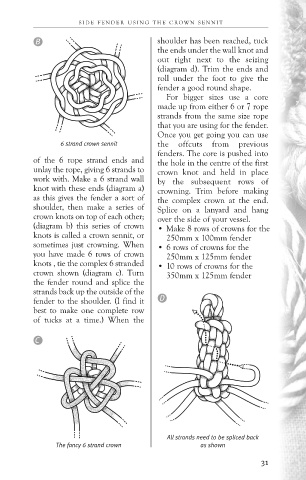
B shoulder has been reached, tuck
the ends under the wall knot and
out right next to the seizing
(diagram d). Trim the ends and
roll under the foot to give the
fender a good round shape.
For bigger sizes use a core
made up from either 6 or 7 rope
strands from the same size rope
that you are using for the fender.
Once you get going you can use
6 strand crown sennit the offcuts from previous
fenders. The core is pushed into
of the 6 rope strand ends and the hole in the centre of the first
unlay the rope, giving 6 strands to crown knot and held in place
work with. Make a 6 strand wall by the subsequent rows of
knot with these ends (diagram a) crowning. Trim before making
as this gives the fender a sort of the complex crown at the end.
shoulder, then make a series of Splice on a lanyard and hang
crown knots on top of each other; over the side of your vessel.
(diagram b) this series of crown • Make 8 rows of crowns for the
knots is called a crown sennit, or 250mm x 100mm fender
sometimes just crowning. When • 6 rows of crowns for the
you have made 6 rows of crown 250mm x 125mm fender
knots , tie the complex 6 stranded • 10 rows of crowns for the
crown shown (diagram c). Turn 350mm x 125mm fender
the fender round and splice the
strands back up the outside of the
fender to the shoulder. (I find it D
best to make one complete row
of tucks at a time.) When the
C
All strands need to be spliced back
The fancy 6 strand crown as shown
31