
Page 15 - The Decorative Painter Fall 2016
P. 15
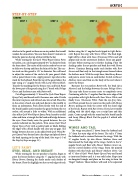
 STEP-BY-STEP
LEAVES
STEP 1 STEP 2
STEP 3
ACRYLIC
   attaches to the gourd so there are no air pockets that would weaken the connection. You now have about 15 minutes to form the point on the top of what will be the hat.
While waiting for the Quik Wood Repair Epoxy Putty to harden, cut a circle approximately 41⁄2" in diameter from the foam sheet. The center of this circle needs to be cut out to slide over the top and form the brim of the hat. The cen- ter circle on this gourd is 13⁄4" in diameter. You will need to adjust the center of the circle to fit your gourd. Mark with a pencil where it sits. Apply painter’s tape above this mark for the hatband. Paint the top of the gourd above the tape using a 5⁄8" angular brush with Lamp (Ebony) Black. Transfer the markings for the breast, eyes, and beak. Paint the lower part of the gourd using the 5⁄8" brush with Foliage Green, and the breast area with Buttermilk.
Cut off approximately 3⁄8" slice of the Quik Wood Repair Epoxy Putty and knead until it becomes one color. Divide this into two pieces and roll each one into a ball. Place this in the center of each eye and push down in the middle to form an indentation. Push down firmly with the end of the brush handle until it touches the gourd to form the eye socket; roll around a little to widen. With an additional slice of the Quik Wood Repair Epoxy Putty, knead to a solid color and form a triangle for the beak and bridge between the eyes. Press firmly onto the gourd between the eye sockets indicated on the pattern. Trim excess Quik Wood Repair Epoxy Putty with a palette knife or blade. Rolling the edges with a brush handle will close any air gaps. The bridge between the eyes is also added with Quik Wood Re- pair Epoxy Putty formed into a fan shape and placed above the beak tapering to the top of the head. (See steps 1–3 of the Step-by-Steps on page 11.)
LET’S PAINT
EYES, BEAK, AND BREAST
While waiting for the eye patches to harden, begin to paint the breast feathers using the 1⁄2" angular brush with Honey Brown, floating the shade under each feather of the breast. Float the highlight on the curved edges of each
feather using the 1⁄2" angular brush tipped in Light Butter- milk. Repeat this step with Warm White. The final high- light will be a float with Snow (Titanium) White and will appear only on the centermost feathers. Erase any graph- ite lines before moving on to further shading. Float the shading under the eye patches and beak first with Honey Brown. Continue floating under each feather with Raw Sienna and float only in the triangle areas formed where the feathers meet. With the script liner, thin Honey Brown and paint a center vein on each feather. Switch to Hauser Medium Green and float on the body of the owl where it meets the breast.
Basecoat the eye patches Buttermilk, the beak Spicy Mustard, and the bridge between the eyes Foliage Green. This may take three or more coats to completely cover. Continuing with the 1⁄2" angular, float the outer edge of the eye patches with Light Buttermilk, then Warm White, and finally Snow (Titanium) White. Paint the eye Spicy Mus- tard. Float around the eye center on the patch with Honey Brown, pulling out from the center with the chisel edge of the brush. Repeat with Raw Sienna. If you have trouble pulling with the chisel edge, use a script liner and thin paint. Create a pupil with the round end of a brush handle and Lamp (Ebony) Black. Dot the pupil at 2 o’clock with Warm White.
WINGS AND TAIL
The wings are placed 2" down from the hatband and 11⁄2" from the outer edge of the breast. The tail is 3" from the hatband and is centered between the wings. With the 1⁄2" angular brush, tip into Hauser Medium Green and float around the back edge of the wings. Switch to the 1⁄4" angular brush and float with Hauser Medium Green un- der the curved feathers of the wings. Form the pointed feathers with this brush and Hauser Medium Green. Cut off 1⁄2" slice of Quik Wood Repair Epoxy Putty and knead as instructed before until it is one solid color. Shape into an elongated triangle and place on the wing to form the “finger” feathers. These feathers will need to be separated
DECORATIVEPAINTERS.ORG
The Decorative Painter • ISSUE NO. 3, 2016 13
