
Page 16 - The Decorative Painter Fall 2016
P. 16
ACRYLIC
to form rounded points. (Refer to the Step-by-Step on page 12.) Another 1⁄2" slice is needed to form the tail feath- ers. They are tapered to a rounded point and are lifted slightly off the gourd as they harden. These will take about 15 minutes to harden, so begin to float a highlight on the curved feathers of the wing and tail with Citron Green. When hardened, paint with Foliage Green. Two or three coats will be needed to cover. Float with Hauser Medium Green then Plantation Pine on the pointed feathers and on both sides of the tips of the raised finger feathers. Feather lines are painted with the script liner brush and thinned Plantation Pine down the center of the tail feather with lines radiating out to the edge (see illustrations). You will need to do this to the underside of the finger feathers. Finish all of the round feathers with a reinforcing highlight of Citron Green and a vein of Hauser Medium Green.
Use a script liner brush and paint vines from the stem with Hauser Medium Green. Use the no. 2 filbert tipped into Hauser Medium Green and Citron Green to form small flip leaves along the stem. The lettering is done with the no. 2 filbert and Lamp (Ebony) Black.
HATBAND AND STENCILED LEAVES
Remove the tape from the top of the gourd and paint this with two coats of Jack-O’-Lantern Orange and a final coat of Persimmon. Using the mini stencil for the leaves, tape off the areas surrounding the leaves you want to sten- cil with painter’s tape. Position them around the gourd coming out from the hatband. Pounce with the 1⁄4" stippler and Tangerine all over the leaves. The top half is pounced with Jack-O’-Lantern Orange, then Burnt Orange at the top of each leaf.
FINISH
Brush on two coats of the DecoArt Americana Ultra Matte Varnish over the gourd and pumpkins. Cut off a 12" piece of jute string and using E6000 or a hot glue gun, glue the pumpkins to the string, creating a loop knot at each end to slide over the fingers of the owl wings. Slide the black foam hat brim over the top.
PUMPKINS
Sand and seal the three wood pumpkin cutouts. Basecoat each with Jack-O’-Lantern Orange. When dry, use the 1⁄4" stippler and pounce the center with Tangerine. To create sections of the pumpkins, float with the 1⁄2" angu- lar and Burnt Orange on the side of the line. Basecoat the stem if you have one with Foliage Green and shade the base with Hauser Medium Green and line with Plantation Pine.
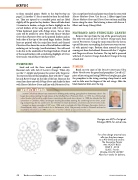
artist’s sketch
Jeanne Collick has always been interested in drawing and painting, going back to elementary school. She began decorative painting through classes at the Little Red Hen in Plainwell, Mich., in 1976. As a full-time high school teacher she found the night classes in painting to be a real stress reliever. In 1988 she attended her first convention in Columbus, Ohio, and began teaching decorative painting. By combining her two loves, teach- ing and painting, she has continued in her retirement to teach at retreats, conventions and in her home studio.
Jeanne has been a member of SDP since 1986 and is involved with West Michigan Decorative Artists in Grand Rapids, Mich., and Friends In Art in Kalamazoo, Mich. She presently resides in Plainwell and can be reached by e-mail at jacollick@sbcglobal.net, or visit her website at jcollickheartworks.com.
Designs are 40% of original. Enlarge 250% for actual size.
For a free design at actual size, affix two first-class stamps
to a #10 SASE and send to: The Decorative Painter Attn: HOOTY BOO ISSUE 3 - 2016
1220 E. First St. Wichita, KS 67214-3907. Allow four weeks for delivery.
14 The Decorative Painter
• ISSUE NO. 3, 2016
DECORATIVEPAINTERS.ORG
