
Page 40 - The Decorative Painter Fall 2016
P. 40
MIXED MEDIA
sets out of the canvas. Glue lace trim and ribbon on the bottom of the tag.
ASSEMBLY
Evaluate your project. If the background around the flower is light, deepen it with Raw Sienna or Midnite Green. If the flower petals do not appear separated, add shading and highlighting as needed to create the desired look.
BACKSIDE
Create a backing with the second tag. You can slip-slap colors from the palette, emboss or stamp with music using a complementary color. I used Light Buttermilk then slip- slapped the greens and pinks mostly hitting the top of the embossed music. I deepened the edges with Raw Sienna for that vintage look. Brush some DecoArt Glamour Dust onto the flower and across the back. Attach a festive tassel. You’re done!
A video lesson of this project is available online at www.decorativepainters.org. To see this video, login to "Members only" section of the The Decorative Painters website page and click the blue link labeled The Decora- tive Painter magazine - Issue #3, 2016, or scan the QR code below to see the video of this project.
Cindy Harrison's Christmas Tag project video.
To use the QR code to view Cindy Harrison’s video of this proj- ect, you must have a smartphone equipped with a camera and a QR code reader/scanner application feature. If you don’t have a QR application, visit your phone’s app store and download a QR code reader/scanner app.
Cut around all the petals and leaves; touch up the edges with color; dark areas use dark paint, light areas use light paint. If you plan on curling your petals, you may want to paint the backside.
Using the tip of your scissors, poke a slit in the center of the sets of petals. Attach the petals by pushing the green brad through the petals and the tag.
Create depth by adding more shading and highlighting where necessary to separate the petals.
Put the assembled flower on surface to determine placement. Put the leaves in the desired position. If you are painting the pine bough, draw a line for the pine bough above the flower.
PINE BOUGH
Paint the bough using a no. 1 liner brush. First, paint the stem and knobby ends with Raw Sienna, highlighted with Light Buttermilk. Shade with Raw Sienna+Midnite Green (1:tch). Paint the needles overlapping the stem and themselves in this order: Midnite Green, Light Avocado, Jade Green.
FINISH
Glue the flower on and then the leaves (tucked under the flower petals). Paint a dot of Terra Coral in the middle of the green brad.
artist’s sketch
Cindy Harrison has been an art enthusiast all her life. In 1994, she made decorative painting her profession. Since 1996, she has been teaching in her home studio, several shops around southern New Hampshire and at local chapters. She has also taught at conventions throughout the U.S. She is currently sponsoring several artists through a Purely Acrylics e-course located at www.purelyacrylics.com. Additionally, she hosts a free weekly live interactive art class online. Cindy’s work appears in the Interactive Artist Magazine, Pixelated Palette, Painting E-Zine and the Japanese publication: Paint Friend.
Connect with Cindy at 18 Greatstone Dr., Merrimack, NH 03054; call her at (603) 429-3556; visit her
websites at www.cindyharrisonart.com and www.purelyacrylics.com. To get info on free classes sent to your own email box, sign up at: email –cindy@cindyharrisonart.com; Facebook – www.facebook.com/cindysdecorativepainting; Twitter – cindy_harrison0.
38
The Decorative Painter
•
ISSUE NO. 3, 2016
DECORATIVEPAINTERS.ORG
L
AA
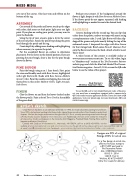
Designs are 50% of original. Enlarge 200% for actual size.
For a free design at actual size, affix two first-class stamps to a #10 SASE and send to: The Decorative Painter Attn: CHRISTMAS TAGS ISSUE 3 - 2016
1220 E. First St. Wichita, KS 67214-3907. Allow four weeks for delivery.
B
C
L L
C
B
L L
L
