
Page 19 - The Decorative Painter Spring 2015
P. 19
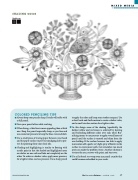
  SHADING GUIDE
Shaded areas
MIXED MEDIA
      COLORED PENCILING TIPS
n Always keep your pencils sharp. Details will suffer with a dull pencil.
n Turn your pencil often while working.
n When lining, a thin line is more appealing than a thick one. Keep the pencil especially sharp as you line and use consistent pressure to keep the lines even and dark.
n Use a small piece of tracing paper between your hand and the paper surface to prevent smudging and to pro- tect the painting from your skin’s oils.
n Shading and highlighting is similar to floating with acrylic paint in that the shaded and highlighted areas are darker on one side and fade out completely on the other. To achieve a darker value, apply more pressure; for a lighter value, use less pressure. Use a sharp pencil
to apply the color and keep your strokes compact. Use a short back-and-forth motion to create a darker value, and a small circular motion for a lighter value.
n In this design some of the shading (specifically, the darkest yellow and red areas) is achieved by layering and burnishing different colors over each other. Bur- nishing means to use pressure to apply several layers of pencil until the surface is smooth and shiny from the wax buildup. If the surface becomes too slick to apply more color, add a quick, very light spray of fixative to the surface to create more tooth. Just remember, too much spray can make the problem worse. Another solution is to erase the area, recover with paint, and start over.
n Use a flat brush to sweep away any pencil crumbs that could become embedded in your work.
DECORATIVEPAINTERS.ORG
The Decorative Painter • ISSUE NO. 1, 2015 17
