
Page 18 - The Decorative Painter Spring 2015
P. 18
MIXED MEDIA
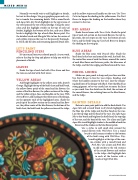
Normally we would wait to add highlights or details, but not in this design. Use gray graphite paper and a sty- lus to transfer the remaining details. With a round brush and Aqua Mix, dry-brush highlights in the upper area of the swirl around the eye of the partridge. Using the same color, pull dry highlight strokes on the tips of each tail feather, highlight the bottom of the feet, and use a filbert brush to highlight the tips of each blue flower petal. Use the detailer brush and Marigold Mix to line the center of each yellow stripe on the vase. Let the piece dry thorough- ly. You’ll add the dots and remaining painted details later.
LET’S PAINT
PENCILING STEPS
It’s time to pull out your colored pencils. As you work, refer to the Step-by-Step and photos to help you with the placement of details.
LEAVES
Shade the tips of each leaf with Olive Green and line the vein on each leaf with Dark Green.
YELLOW AREAS
Add bright highlights to the yellow areas with Spanish Orange. Highlight the top of the bird’s chest and bird’s beak, the yellow flower petals of the round and fan flowers, the center of the blue flowers, the yellow sections of the tulips, and the yellow stripes, base, and handles on the vase. With Sienna Brown, add shading to the yellow areas of the design, on the opposite ends of the highlighted areas. Shade the petal tips of the yellow section on the round and fan flow- ers, the yellow center of the blue flowers, the bottom of the bird’s chest, the bird’s beak, the yellow sections of the tulips,
and the yellow stripes and handles on the vase. Use Terra Cotta to deepen the shading in the yellow areas. Use Dark Brown to deepen the shading on the handles where they connect to the vase.
RED AREAS
Shade the red areas with Terra Cotta. Shade the petal tips of each red section on the round flowers, the red tu- lip petals, the red stripes on the vase, the bottom of each berry, and the bird’s wing tip. Use Dark Brown to deepen the shading on the wing tip.
BLUE AREAS
Shade the blue areas with Peacock Blue. Shade the bird’s head at the base and around the swirl, the bird’s feet, the center blue area of each fan flower, around the center of each blue flower and between petals, the blue areas of the tulips, and the blue edging and band around the vase.
PENCIL LINING
Make sure your pencil is sharp and your lines are thin. Use Dark Brown to line the vase stripes, banding, and where the handles connect to the vase. Line the remain- ing dark lines of the design with Black. Note that Black has strong pigment, so be very careful not to smear the lines as you work. Line the details on the bird, the sections of the round flowers, the radiating lines on the blue flowers, and the tulips.
PAINTED DETAILS
Return to your paint palette to add the final details. Use Aqua Mix and a round brush to dry-brush highlights on the blue tips of the tulips and the blue band on the vase. Line the top edge and the band of the vase. Use Light Aqua Mix to dry-brush and brighten the bird’s head, the top edge of the vase, and the band of the vase. Use a liner and Light Aqua Mix to add highlight strokes to the middle of each fan
flower and the strokes on the blue flower petals.
Use a stylus to add small dots around the round flowers with Wild Rose. Use a round
brush to add comma-strokes to the bottom of the bird’s wing with Wild Rose. Dry- brush highlights at the tips of the com- ma-strokes with a round brush and Pink Mix. Use a liner and Pink Mix to add strokes to the red sections of the round flowers and strokes to the tulips. Add highlight dots to each of the berries with a
touch of Light Pink Mix.
DECORATIVEPAINTERS.ORG
