
Page 27 - The Decorative Painter Spring 2015
P. 27
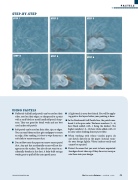
  STEP-BY-STEP
STEP 1
STEP 2
STEP 3
PASTELS
        STEP 4
STEP 5
STEP 6
 USING PASTELS
n A light touch is your best friend. You will be apply- ing quite a few layers before your painting is done.
n In the Rembrandt Soft Pastels line, the pastel num- bered .5 is the pure color. The lower numbers (.1–.4) have black added, with .1 being the darkest. The higher numbers (.6–.10) have white added, with .10 in some colors looking almost pure white.
n When working with velour (suede) paper, do not sketch directly on the paper. Instead, trans- fer your design lightly. Velour indents easily and cannot be repaired.
n Protect the areas that you want to leave unpainted. Smudges do not clean up; if they do occur, incorpo- rate them into your design.
n NuPastels (called hard pastels) can be used on their sides, used on their edges, or sharpened to a point with a sand block or metal handheld pencil sharp- ener. They are great for detail work and are best used under soft pastels.
n Soft pastels can be used on their sides, tips, or edges. You can sand them on fine-grit sandpaper to create an edge. After sanding, it is best to wipe them on a soft cloth to remove excess dust.
n Do not blow onto the paper to remove excess pastel dust. Any spit that accidentally occurs will not dis- appear on the surface. You also do not want to ac- cidentally breathe in the dust. A baby bulb syringe works great to puff off the extra pastel specs.
DECORATIVEPAINTERS.ORG
The Decorative Painter • ISSUE NO. 1, 2015 25
