
Page 47 - The Decorative Painter Spring 2015
P. 47
als (Step 3). Notice that the top petal (Step 4) is the curved comma-stroke that lies horizontally across the top of the flower. Using the liner brush you are now ready to apply the White dots to the center of the bowl. The curved line that shades the left half of the bottom of the bowl is created with Red Purple (not tipped with White) on the liner.
LEAVES: Paint the nine leaves that encircle the blossom with Pine Green on the no. 5 round. Using White on the liner, apply as much linework (outlines and veins) to the leaves as you would like.
Add extra embellishing lines, squiggles, and dots with White on the liner to loosen up the design.
GERANIUM
LEAVES: Add the leaves with Pine Green+Yellow (1:1) on the no. 5 round. Allow these to dry for at least half an hour before painting the petals.
PETALS: The petals are a brush-mix of Red+Orange, sometimes tipped in White, using the no. 4 filbert. Alternate colors and sizes until you are satisfied with the petals.
Add embellishing lines and squiggles with Yellow and/or Pine Green with the short liner or the script liner.
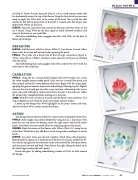
CARNATION
PETALS: Using the no. 5 round double-loaded with Red+Orange (1:2), create the seven straight comma-stroke petals. Each starts at a central base point, and then extends outward in seven different directions. Begin with the center petal, applying the greatest amount of pressure and making it the largest petal. Slightly decrease the size of each pair of petals as you continue. Alternating sides as you paint each petal will help to ensure each petal in the pair is the same size. Allow the petals to dry completely before moving on to the stem.
STEM: With Pine Green on the no. 5 round, add the flower’s stem and leaves. The stem is slightly curved, while the leaves are straight comma-strokes.
Loosen up the design with White highlights on the petals, leaves, and stem. Add sets of three White strokes around the flower.
ASTERS
This design features three aster flowers. Create center (and largest) flower first. PETALS: Add straight, thin strokes Bright Blue using the no. 1 short liner. First paint the very top center, the bottom center, the right center, and the left center petals. After those four are created, fill in the remaining spaces with petals. CENTER: Paint the centers of the flowers with Yellow+White (1:1) using the tip of the liner. When this is dry, add Brown seeds using either a toothpick or a liner brush.
LEAVES: An aster’s leaves are soft and “squishy”, which takes a bit of practice. Heavily load the square no. 4 shader brush with Pine Green and a sideload of Yel- low. Start by laying the brush where the center of the leaf will be. Now press down, and then press forward and back. Next slide to the right, lifting the brush up to the chisel edge (creating the leaf ’s point).
Finish this glass by adding embellishing strokes of White or Gold around the design.
DECORATIVEPAINTERS.ORG The Decorative Painter • ISSUE NO. 1, 2015 45
GLASS PAINTS
CARNATION
GERANIUM
ASTERS
