
Page 64 - The Decorative Painter Spring 2015
P. 64
ACRYLIC
LET’S PAINT
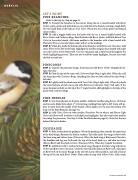
PINE BRANCHES
Refer to the Step-by-Step on page 61.
STEP 1: Transfer the branches to the canvas. Using the no. 4 round loaded with Burnt Umber, paint a push-and-pull stroke as you work down the branch, creating a rough limb. The two small buds at the ends are True Ochre. When dry, use a white pencil to freehand some needles.
STEP 2: Add a wiggly stroke over the limbs with the no. 4 round double-loaded with Burnt Umber and Cashmere Beige. Float the buds with Burnt Umber. Add little dots of True Ochre to the entire branch. Add some needles to the branches with a liner loaded with Plantation Pine or Avocado (these colors will act as the shading).
STEP 3: When dry, shade the bottom side of the branches with Bittersweet Chocolate. Add some Yellow Ochre dots to the buds. Highlight the needles using the liner loaded with Light Avocado+Celery Green+Buttermilk. Use very thin paint and a dirty brush throughout the whole highlighting process. Take care not to add too many highlights, because you want the bird to stand out.
PINECONES
STEP 1: Transfer the pinecone design, then basecoat with Burnt Umber. Reapply the de- sign when dry.
STEP 2: Float the tips of the cones with Cashmere Beige (Step 2 right side). When dry, add the sharp tips with Cashmere Beige, extending thin lines on both sides of the tips (Step 2 left side).
STEP 3: Lightly wash the whole cone with True Ochre (Step 3 right side). When dry, shade the inner bottoms of each cone petal with Bittersweet Chocolate (Step 3 left side). If the cones become too dull, use the tip of the 1⁄4" angle brush to add highlights to the tops of the petals with Cashmere Beige.
PINE NEEDLES
STEP 1: Use thinned paint on the pine needles. Add pine needles using the no. 10/0 liner and Avocado. Make them about 1" (2.5cm) long working from right to left. Some will ap- pear to come from the middle of the branch. Add a slight curve to some for realism (See Step 2 of the Pine Branches on page 61).
STEP 2: Add Celery Green to some needles, Plantation Pine to others, and Hauser Light Green+tch Buttermilk to others to add depth and highlights. You also want some needles to overlap the pinecones. (See Step 3 of the Pine Branches on page 61). Note that the one behind the bird is darker.
CHICKADEE
STEP 1: Refer to the photo for guidance. When the painting is dry, transfer the main lines of the bird design. Basecoat the bird in sections: The belly under the wings is Buttermilk; the front wing and tail are Snow (Titanium) White; the back wing is Bittersweet Chocolate; the shoulder and legs are Driftwood; the top of the head, beak, eye, and chin are Lamp (Ebony) Black; and the cheek is Snow (Titanium) White. When dry, transfer the details. STEP 2: Add Buttermilk C-strokes to the back wing. Rough in the front wing with Burnt Umber and Bittersweet Chocolate. Circle the eye with little dashes of Buttermilk. Add spots of Buttermilk to the head. Rough in the tail with Lamp (Ebony) Black, and add a float at the top of the tail with Burnt Umber. Float under the cap with Yellow Ochre. Add a wash
DECORATIVEPAINTERS.ORG
