
Page 69 - The Decorative Painter Spring 2015
P. 69
ACYLIC
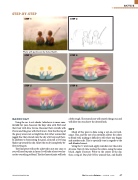
STEP-BY-STEP
STEP 1
STEP 2
Photo with permission by Amie Martin
STEP 3
STEP 4
BASECOAT
STEP 5
STEP 6
a little rough. The second coat will smooth things out, and will allow you to achieve the desired look.
SKY
Much of this piece is done using a wet-on-wet tech- nique. This, and the use of an extender, allows the colors to blend well, making it difficult to tell where one begins and another ends. This is especially true in regards to the well-blended sunset.
Using the 3⁄4" oval wash, apply extender over the entire sky area. Now it’s time to place the colors, using the same brush. Apply Titanium White to the center of the sky, then a ring of Diarylide Yellow around that, and finally
Using the no. 4 or 6 shader (whichever is more com- fortable for you), basecoat the boys’ skin with Flesh and their hair with Raw Sienna. Basecoat their overalls with Denim and the grass with Dark Green. Note that the top of the grassy area is not a straight line, but rather a somewhat jagged line that extends into the sky a bit here and there. In addition to basecoating the grass, also pull a few long blades up toward the sky. Allow this to dry completely be- fore moving on.
The final piece will not be achieved in just one coat, so you will need to paint in layers. It will take at least two lay- ers for everything to blend. The first layer of paint will look
DECORATIVEPAINTERS.ORG
The Decorative Painter • ISSUE NO. 1, 2015 67
