
Page 124 - The Decorative Painter Fall 2014
P. 124
ACRYLIC
LET’S PAINT
SCROLLS
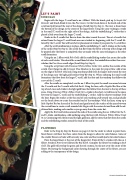
Begin with the larger C-scroll and a no. 4 filbert. With the brush, pick up Jo Sonja’s Gel Retarder and brush-blend it into the Pine Green. Set the brush down at the knob end of the scroll and pull toward the root of the design (Scroll Step-by-Step 1). The root is found near the bottom of the design in the center of the large flower. Using the same technique, stroke in the small C-scroll on the right side of the design. Add the embellishing C-stroke that is placed a little away from the larger C-scroll.
Stroke in the S-scrolls that flow in from the sides toward the root. The set of scrolls that extend from the larger C-scroll knob are now stroked in, beginning with the C-scroll fol- lowed by the S-scroll. You will have better placement of strokes if you paint the C-scroll first.
After the scroll combination is in place, add the embellishing C- and S-strokes on the inside of the scrolls (Step-by-Step 2). The scrolls that flow from the flower at the top of the design will be painted after the flower is completed; they are made with the same techniques as the other scroll formations.
Using the no. 2 filbert with Rich Gold, add the embellishing strokes that are on the inside of each scroll stroke. This should be a small band of color that embellishes rather than over- whelms the Pine Green scroll edges (Scroll Step-by-Step 3).
Using the script liner with Titanium White+Yellow Oxide (4:1), outline the outside of the scrolls. Don’t forget to add Jo Sonja’s Flow Medium to the paint for proper flow. Add a line on the edge of the Rich Gold and a long teardrop pulled from the largest end toward the root of the design near the light gold outline (Step-By-Step 4). When outlining the small scroll formations that flow from the larger C-scroll, add the dots and the teardrop that follows the curve of the C-scroll.
After the scrolls are completed, use the no. 2 filbert to paint the small vase areas between the C-scrolls and the S-scrolls with Red Earth. Using the liner, add a Napthol Red line at the top of each vase and stroke in the light gold lines that follow from the root to the top of these areas. Using Titanium White+Yellow Oxide (4:1), stroke in the short curved lines in the space between the larger C-scroll and the embellishing C-stroke. Add the shorter teardrops with the liner. Begin the strokes at the thin end of each teardrop, pull toward you, and gradually set the brush down to create the rounded end of the teardrops. With the liner, scoop up a little Napthol Red on the end of the brush and gently touch the surface of the space between the curved lines to create a well-rounded dot. Begin with the center dot and then add the ad- ditional dots, making each smaller as you go away from the center dot.
Apply the Rich Gold strokes around the ends of the scrolls using the no. 2 filbert for the S- and C-stroke combinations. Add outlining using the liner with Titanium White+Yellow Oxide (4:1). Continuing with the liner and the light gold mix, add the stems that flow from the scrolls and the embellishing strokes around the ends of the scrolls.
FLOWERS
Refer to the Step-by-Step for flowers on page 121 for the order in which to paint them. Most flowers will have the three colors from the design to allow for color balance. Some of the smaller flowers or buds will have only one color and that would also be for color balance.
Paint the large flower at the root of the design first. Paint all the C-strokes with the no. 2 filbert. Stroke in Pine Green followed by Red Earth. Complete the flower by stroking in Rich Gold. The gold will overlap the green and the red sections, but do not cover the center of the flower. By leaving the background color showing through the center of the flower, you are adding to the transparency of the design.
dEcOratIvEpaINtErS.Org
