
Page 62 - The Decorative Painter Fall 2014
P. 62
Basecoat the area above the line with Blackberry+Carbon Black (2:1) using the no. 8 flat or the 3⁄4" wash. Reserve some of this mix on the palette for later use. This mix will be referred to as Dark Background Mix.
Basecoat the tablecloth (the area below the pencil line) with Smoked Pearl using the no. 8 flat, and the square base with Provincial Beige. While the square base is wet, slip-slap a splotchy layer of Smoked Pearl on the four edges. Let this dry completely.
TRAnSFERRInG THE DESIGn: Either apply the entire design or eliminate the checkered tablecloth at this time, if you prefer more accurate, straight lines that will be produced by using the ruler. Instructions on how to mea- sure the tablecloth without having transferred its lines will follow. Alterna- tively, you can both transfer the checkered design and follow the instruc- tions for painting them.
LET’S PAINT
TABLECLOTH
If you have not already transferred the lines for the checkered table- cloth, draw the checkered pattern using a clear ruler and a pencil to make a grid of 1⁄4" to 3⁄8" squares. Apply color to every other square with Burgundy on the no. 8 flat.
When highlighting the tablecloth squares, do not highlight those that are next to the mushrooms, garlic, and soup pot. This will create a subtly shaded area. With the dirty no. 8 flat, pick up a bit of Vermillion and add small, somewhat square highlights to the Burgundy squares (refer to the photo on the left).
Using the dirty brush, brush-mix Vermillion+tch Yellow Light for the final highlight on the squares. This is a slightly smaller highlight that sits on top of the Vermillion highlight. Using the no. 1 short liner, brush-mix Burgundy+Dark Background Mix to create a dark red. Line the left side and the bottom of each Burgundy square with this mix. Highlight the Smoked Pearl squares with Titanium White, using either the no. 6 filbert or the no. 8 flat. Keep the highlight small. A second small application of Titanium White may be necessary.
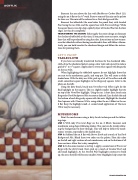
MUSHROOMS
Paint the mushrooms using a dirty-brush technique and the follow- ing steps.
STEP 1: With inky Provincial Beige on the no. 8 filbert, basecoat each mushroom using shape-following strokes. This coat can be streaky, allow- ing the background to show through. This will help to define the mush- rooms’ sections, especially in the shaded areas.
STEP 2: Sideload the no. 8 flat with Brown Earth and a touch of the Dark Background Mix. Blend these two colors on the palette. Float this color on the left and right sections of each mushroom, and on the bottom of all three sections. Allow this to dry completely.
STEP 3: In the same manner as in Step 1, apply a second coat of Provincial Beige with the dirty brush. Next, pick up a touch of Smoked Pearl and add small highlights. As the Smoked Pearl highlights continue to build up, the areas they fill will become smaller. Note: Highlights help create the
dEcOratIvEpaINtErS.Org
ACRYLIC
