
Page 96 - The Decorative Painter Fall 2014
P. 96
SKILLBUILDER
BUILDINGS
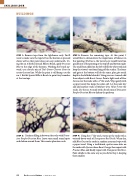
STEP 1: Remove tape from the lighthouse only. You’ll want to make sure the tape left on the horizon is pressed down well so that paint does not seep underneath. Us- ing the no. 4 Keith’s Special Effects Brush, apply Prussian Blue to the edge of the horizon. Working the brush up- ward, use a brush-mix of Teal Green+Chrome Green to create the tree line. While the paint is still damp, use the no. 1 Keith’s Special Effects Brush to paint tiny branches at the treetops.
STEP 2: Remove the remaining tape. At this point, I would like to demonstrate the importance of balance in this painting. If left as is, the viewer’s eye would travel too quickly out of the painting at the top left and bottom right. The small boat added on the left will fill the white void and keep the viewer’s eye from flying off the surface. The fence and gate at the bottom will do the same, plus give aerial depth to the hillside behind it. Using your no. 4 round, add these objects with Burnt Sienna. Paint a light wash of Raw Sienna over the rocks with a 1" flat wash. Wipe gently with a paper towel; this keeps the color soft. Let the paint dry and add another wash of Medium Grey Value 6 over the rocks. Use the no. 6 round with a brush-mix of Dioxazine Purple+Prussian Blue to darken the pathway.
STEP 4: Using the 1" flat wash, warm up the rocks with a watered-down wash of Transparent Red Oxide. When dry, add Blue Grey to the rocks in random areas and wipe with a paper towel. Using a toothbrush, spatter some dots on the rocks with Quinacridone Burnt Orange, then repeat with Prussian Blue, and finally repeat with Transparent Red Iron. Paint shrubs in the same way as you did in Step 1, keeping them smaller.
STEP 3: Continue filling in between the rocks with Dioxa- zine Purple+Prussian Blue. Leave some small round spots and darken around them. This creates phantom rocks.
94 The Decorative Painter
• ISSUE NO. 3, 2014
decorativepainters.org
