
Page 121 - The Decorative Painter Summer 2014
P. 121
1
PREPARATION
36 63
4 2442 314112 5 333210
6 2113651 11 3452311
Although the Gessobord is already
sealed with a layer of acrylic, I prefer to
add a fine textured surface. Very light-
ly sand the surface with sandpaper to
smooth out any inconsistencies. Pour
White Wash onto the glass palette, fill the
3⁄4" wash glaze with paint, and quickly
brush over the surface. You want a nice
coat, but not heavy. Using the sponge
roller, quickly roll over the surface in one
direction and then the other, until the surface has a very fine texture and appears almost dry. If the paint bubbles up, you have applied too much paint. Wipe off the roller and just keep rolling until the surface has the right texture.
Dry well with a hair dryer. Check the surface with the back of your fingers; if it feels clammy, then it is not dry enough. Continue until the surface feels dry to the touch.
Thin the White Wash slightly with water and repeat the above process. Dry well with a hair dryer.
Transfer the design onto the surface using white graph- ite. If the tracing is not easily seen, then use household dust to bring it out. Rub hand over the dusty surface—hopefully you can find one—then rub over the design. The tracing should appear.
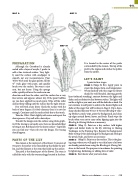
PARTS OF THE LILY
The stamen is the male part of the flower. It consists of two parts: the anther is the rounded top that holds the pol- len, and the filament is the stem that holds up the anther.
The pistil is the female part of the flower. The stem is called the style, with the ovary and eggs located at the base.
dEcOratIvEpaINtErS.Org
The Decorative Painter • ISSUE NO. 2, 2014 119
2
6 8
1 NYm 3
9 13 16
3 12 6 511114
mAP B1
12 1
7
99
11 9 11
2 2
3 4342
243
1211 1111
8
12 1212
11
23
13 16
12 1214
6 1112 10 4
13 10
1 681
9
89 14 996
4
1 1 35 3+4 332 10
484 123 3 13
15 13 2 5
OIL
mAP A
mAP B
NYm 1 4
3
5 10 101 25
9998 95855
511 5 9 3 91149
It is located in the center of the petals surrounded by the stamen. The top of the pistil is the stigma and catches the pollen from the anther.
LET’S PAINT
I paint in four stages:
STAGE 1: (Maps B, B1): Apply paint to create the design, form, and temperature. When finished with this stage the flower should be well blended, showing growth
99
lines (softened streaking), contrast between the lights and darks, and no distinctive line between values. The lights will not be as light as you want, nor will the darks be as dark. Do not continue to add paint to achieve the desired lights and darks at this stage; that will be done in Stage 2. Dip a clean, sharp chiseled flat into Winsor & Newton Blending & Glaz- ing Medium, pinch-wipe, paint the background, and clean up edges around flower, leaves, and buds. Pinch-wipe the brush often so as not to carry color, dipping again into the Blending & Glazing Medium as necessary.
STAGE 2: (Map C): Paint on a dry surface. Add higher lights and darker darks to the lily referring to Glazing Technique in the Painting Tips. Repaint the background. Refer to Map D for darkening of the background. Reshape the petals, buds, and leaves as necessary.
STAGE3: (MapD):Paintonadrysurface.Thisistheglaz- ing stage where you will apply a very thin layer of oil over an already painted area using the Blending & Glazing Me- dium in the brush. The purpose is to enhance the painting by lightening, darkening, or adding tints of color. STAGE4: Reevaluatewhatyouhavedone.
