
Page 123 - The Decorative Painter Summer 2014
P. 123
STEP 3
STEP 4
OIL
blender). Make sure that there are no strong edges, but the colors should remain distinctive.
STEP 5: Refer to Map D on page 120 and place darker val- ues of background using the Black Mix where indicated. Softly blend into previous values. Be careful not to lose the color already placed. Add more values to brighten or darken as needed.
STEP 6: Clean up the buds, leaves, and lily with Blending & Glazing Medium as needed.
STAGE 3
STEP1: RefertoMapDonpage120.Addmoredarksand lights as indicated on lily, buds, and leaves. Use a small amount of paint. Do not cover much of the original appli- cation. Also apply dark values in the triangle-shaped areas. These are the areas that are the darkest, where light does not penetrate. Do not over-blend.
STEP 2: Review the background and add color using the same method as Step 1, where needed. Keep the back- ground in the back. Glaze darker values to pull the lily for- ward. Some background color can be placed on the buds and leaves to blend them into the background a bit, if nec- essary. Add small tints of the flower colors in the upper part of the background. This will be minimal and loose. Do not over-blend.
WATER DROPLETS
Use the mini brushes for all the water droplets.
STEP 1: Because the light source is coming from the up- per right, place Titanium White in the lower left area in a crescent shape leaving the middle open.
STEP 2: Water reflects the surrounding colors. Place the appropriate value in the upper right area of the crescent. This color reflects the area of the petal that the water drop- let sits on, so make sure you choose a value close to the petal color.
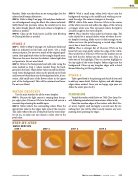
STEP-BY-STEP
WATER DROPLETS
STEP 1 STEP 2
STEP 3: With a small mop, soften both values into the background starting in the middle and working out to- ward the edge. The color is strongest at the edge.
STEP 4: Add a little more Titanium White in the center of the white crescent and soften the edges of this to keep a stronger white area. This represents where the light is actually caught in the water droplet.
STEP 5: Place shadow value under the bottom edge. The color should be a natural darker value of where the wa- ter droplet is resting. Make sure it is dark enough to see. Soften out over the petal keeping a curved edge. Make sure it has at least three values.
STEP 6: Place a stronger dot of Titanium White on the lower left area and gently soften the edge of the white. Place a little bit of Titanium White on the shadow area in line with the dot. Soften into the shadow area. This is a reflection of the highlight. Place an uneven highlight at the top right of the water droplet. Soften edges into the background. Clean up any irregular edges with a chisel flat and Blending & Glazing Medium.
STAGE 4
Take a good look at the painting and decide if you need to add any more detail. Darken, lighten, and add sharper edges where needed. Once you are happy, sign your art. Allow the entire piece to dry.
FINISHING
Varnish the surface with Krylon no. 7002 Clear Spray Var- nish, following manufacturer’s instructions. Allow to dry.
Paint the wooden edges of the surface with Black For- est Green. Lightly sand and apply a second coat. By var- nishing first you will be able to easily remove any over- painting from painting the edges.
dEcOratIvEpaINtErS.Org
The Decorative Painter • ISSUE NO. 2, 2014 121
