
Page 122 - The Decorative Painter Summer 2014
P. 122
OIL
mAP C
CGP
mAP D
13 2 CGP 41 324
3 114Gm TG49
9 TG
3
14
CGP
2 121 12 TW 4 2 9 19 9 99
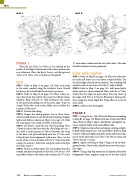
STAGE 1
1⁄4" mini rake to soften into the wet petal values. The color should be obvious but not prominent.
BUDS AND LEAVES
STEP1: RefertoMapBonpage119.Placethevaluesfor the buds and leaves in a very loose, streaky fashion. Use the chisel edge of the brush to combine. The streaking will simulate veins on the leaves. Use the 1⁄4" rake to blend. STEP 2: Refer to Map C on page 119. Add more lights, darks, and tints where indicated. Rake with the 1⁄4" rake. Notice that the edges are quite messy. You may clean up the edges with Winsor & Newton Blending & Glazing Me- dium using the chisel-edged flat. Wipe often so as not to carry color.
STEP 3: Allow to dry thoroughly.
STAGE 2
STEP1: Usingtheno.1flat,fillinthefilamentsaccording to Map B1 on page 119. Blend with one of the mini filbert rakes. Refer to Map C above. Add darker and lighter val- ues as needed. Soften with a mini filbert rake.
STEP2: Stippleontheantherandstigmacreatingaslight- ly fluffy look using the no. 10/0 mini filbert. Refer to Map C above. Add more lights and darks to the anther and stig- ma to create separation. Use Value 2 for the ooo areas and Value 9 for the //// areas.
STEP 3: Again, referring to Map C begin to lay in back- ground values. These values should be messy with no per- fect edges.
STEP 4: Using a slip-slap motion in an X pattern, blend the background values together using one of the flats (chisel
1222 46610 419 10 11 6 4 2 11 14
4 9 1212569 3 1492 Bvm
321666 149691 111 1 121 TG 14 TG 41
111325441 19 1
4 12 CGP TG 9 9
1 21 2 6 T G T G
29 9 TW23 1 99 913 13121284NYm1 1111999
1333DR 1913
1 1 4 3 Bvm 13 13 CGP1 DR TW10 99 9
Bvm
1312 9Bvm1
4 10 12 13 1 CGP TW 11 73
310 3CGP1112 15 Bvm
13 9Bvm
TG
TW
DR
Place the Lily Value 1 to Value 11 in a column on the palette. It will help to label each of the value numbers for easy reference. Place the Buds, Leaves, and Background Value 12 to Value 16 in a column on the palette.
LILY
STEP 1: Refer to Map A on page 119. Paint each petal in the order marked using the synthetic Loew-Cornell brushes or the Scharff sable brushes of your choice.
STEP 2: Refer to Map B on page 119. Place values us- ing a flat brush that will fit the space best. Blend values together. Rake with the 1⁄4" rake starting in the center of the petal and pulling out to the petal edge. Wipe on Simply Tacky after each stroke. Make sure to follow the contour of the petal.
STEP3: Reversetheraking.
STEP 4: Repeat the raking process two or three times, which should achieve a nice blend and streaking. Reapply lights and darks as shown on Map C on page 119. Rake the areas again. Use a mop to soften, if necessary.
STEP5: OnPetal1createthetwoveinsbypullingValue 1 from the tip to the base with the chisel edge of a no. 1 flat. Add a small amount of Value 9 between the veins at the base, and pull and blend with the 1⁄8" rake until it blends into the background. Add more Value 1 in the center of the curve and soften with the 1⁄4" rake then with a mop, if necessary. Add veins using the same technique on Petals 2 and 3.
STEP 6: Petal 4 is a little trickier. The cast shadows from the stamen and pistil are placed at this time. Use the no. 10/0 mini filbert to lay in the values and use either the 1⁄8" or the
120 The Decorative Painter • ISSUE NO. 2, 2014
decorativepainters.org
