
Page 60 - The Decorative Painter Summer 2014
P. 60
FABRIC PAINT
FLOWER
als. When the flower’s center is dry, use the no. 3 Sakura Mi- cron Permanent Pen to fill it in with tiny circles.
LEAVES
STEP 1: Using the no. 2 filbert, dry-brush the under- sides of the leaves with Pistachio Green. Next, shade the underside near the top with Wisteria. Keep the bottoms a light Pistachio Green.
STEP 2: Workingoneleafatatime,applyalightbasecoat of Fabric Painting Medium to the leaf ’s top, using the no. 8 filbert. While this is wet, pull a stroke of Pistachio Green from the bottom toward the center. Pick up Avocado Green on the brush and pull a second stroke from the middle of the leaf upward onto the stem. Avocado Green will be the prominent color on the stem. Using the same brush, pull strokes of Avocado Green+Pistachio Green, starting at the outer edge of the leaf and working toward the middle vein, with the vein being the lightest area. When this is dry, use a dark gray-green mix of Antique Gold+Lamp Black to shade the top of the leaf (where it joins the stem, and where another leaf lays over it). Allow this to dry completely (overnight is preferable).
TANGLES
The pens will last longer and their lines will be cleaner if the paint is completely dry before inking. Multiple pens are often needed when used on painted fabric areas. With the no. 1 pen, outline all elements of the entire design. Use the no. 3 pen for heavier lines, like veins and some tangles. Do not hesitate to create your own, unique tangle designs in the stems and on the leaves.
FINISHING
If extra sparkle and bling are desired, embellish the flowers’ centers, the butterflies, the tangles on the veins, and anywhere else you choose with the Swarovski Crys- tal Elements.
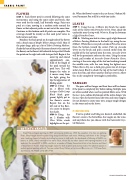
STEP 1: Each flower petal is created following the same instructions, and using the same colors and brush, that were used for the small, half butterfly wings. Paint one petal at a time, moving in a random order around the flower so that adjacent petals are not wet at the same time. Continue in this fashion until all petals are complete. The coverage should be streaky so that each petal varies in both texture and value.
Reinforce the back petals on the right side of the flower with a brush-mix of Bright Yellow+Antique Gold. Hint: If the paint drags, pick up a bit of Fabric Painting Medium. Shade the base of the petals (the areas closest to the center of the flower) on the flower’s left side with Antique Gold. Shade the petals on the right side with Antique Gold. Begin at the
outer tip and extend approximately one- third of the length of the petal toward the petal base. This will deepen the value as it moves away from the light, giving the tips the appearance of folding under. STEP2:Using the no. 2 filbert with Antique Gold+Lamp Black (dark gray- green) lightly pat in the flower’s center. Repeat this on the left side of the flow- er’s center to deepen the shade.
STEP 3: Using the no. 2 blender with Ultra White, streak highlights on the pet-
dEcOratIvEpaINtErS.Org
artist’s sketch
Sheryl Nelson began painting in 1997 sprucing up birdhouses. With the exception of a class on applying floats, Sheryl taught herself to paint using design books from craft stores. Working craft shows in the Chicago area, teaching classes to friends, and selling her pieces in craft malls, she developed a following of faithful cus- tomers. In 2000, Sheryl returned to her native Texas, where she has taken classes with inspiring teachers in all mediums. She joined SDP in 2006, and she is a member of Alamo Decorative Artists in San Antonio and Heart of Texas Tolers in Austin. Sheryl has taught classes for both chapters and at area studios. Her absolute passion is realistic portrait painting with oils. You can contact Sheryl Nelson at caselegance@sbcglobal.net; 510 Texas Point, San Antonio, TX 78260; (210) 481-7763.
