
Page 92 - The Decorative Painter Fall 2017
P. 92
HOLLY: Highlight with Antique Green and shade with Hauser Dark Green+Lamp (Ebony) Black (1:1). Dot ber- ries with Santa Red and highlight with Snow (Titanium) White+Santa Red (1:tad). Stipple with Snow (Titanium) White.
ROCKS: Shade with Lamp (Ebony) Black. Highlight with Snow (Titanium) White+Grey Sky (1:tad).
SNOW: Paint with Snow (Titanium) White and then wash very thinned True Blue across snow patches.
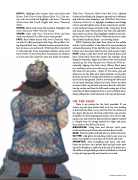
FACE: Paint whites of eyes with Snow (Titanium) White, iris with True Blue and pupils with Lamp (Ebony) Black. Us- ing thinned Flesh Tone, sideload shadows around the hair- line, the nose, eyes and mouth. With Deep Blush+Santa Red (1:tad), paint lips. If you need deeper shadows, add a tad of Burnt Umber to your Deep Blush and deepen the shadows in a few areas, like under his nose and under his hairline.
With Snow (Titanium) White+Santa Red (1+1), sideload cheeks so they blend and disappear upwards to cheekbones and with this color shade lips, too. With Flesh Tone+Snow (Titanium) White (1+1), highlight cheekbones and bridge of nose and the lightest areas of skin around eyes and be- tween forehead creases and front of lips. Using liner brush and thinned Lamp (Ebony) Black, line eyes and add lashes (keep them very short). Place highlight twinkles in each pu- pil with Snow (Titanium) White. Work with the face so your Santa looks friendly and kind – no scowling Santas!
HINT: Eyebrows that don’t draw down in the middle and the “smile wrinkles” at the sides of the eye contribute to a pleasant demeanor. If you don’t like your Santa’s face, don’t hesitate to re-basecoat it and start over until you get it right. HAIR: Using a script liner brush and thinned paints, pull lines of hair from where they sprout. For example, when doing the mustache, begin at the base of the nose and pull out and up. Use Grey Sky and Snow (Titanium) White, oc- casionally dipping into fresh Lamp (Ebony) Black paint, too, working wet-on-wet until you get your desired look. My Santa is in his prime – about 56. The more gray and white you use, the older your Santa will look. As you paint the hair, do not let it overlap the bluebird or cardinal since they’re in the foreground. Allow it to overlap the dove since it’s on Santa’s shoulder, behind his beard. Notice the three sections of hair: top of head, mustache, directly under bot- tom lip section and then the full beard coming out of that. Leave lots of black background for a more youthful Santa. Enjoy adding faint scrolls and curls at the tips of the beard.
ON THE BACK
There is no pattern for the back provided. If you choose to paint your Santa’s back as if you were looking at him from the back, use a pencil to draw the outlines of the shapes like his hat, the back of the birds seen over his shoulders, the belt wrapping around his waist, the fur edg- ing his coat and where his pants and boots appear beneath it. Simply wrap the image around the edges and paint these items as you did on the front.
BIRDHOUSE: Using liner and Glorious Gold, paint scrolls and linework. Paint pole and roof Burnt Umber. BASE: Paint Navy Blue and add Glorious Gold scroll work. GLITTER: Add glitter of matching color to any area you desire. I put glitter on each bird, on the bells and snow. SNOW-TEX: After assembling your Santa with bird- house on the base, use a palette knife and pile snow onto top of the birdhouse, under the hole and at the pole’s base. The ribbon and gold bell go under the birdhouse, attached to the pole. Sign proudly and varnish your work.
90 The Decorative Painter
• FALL 2017
DECORATIVEPAINTERS.ORG
