
Page 35 - DPM3_Fall_2021_Flipbook
P. 35
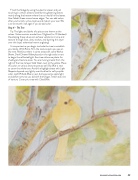
Finish the foilage by using the electric eraser and just touching in certain areas to look like tiny glistening leaves mainly along the bottom where the sun would hit the leaves. Use Cobalt Green around some edges. You can add colors after you burnish, so be creative and make it your own! Be sure to smooth it all again if you do add color.
Step 4 – The Tree
Tip: The lights and darks of a picture are known as the values. Values contain a scale from 1 (lightest) to 10 (darkest). Developing these values can achieve variations in tone and texture through lines, dots, strokes, and layering thin layer over thin layer, otherwise known as glazing!
It is important as you begin to shade the tree to establish your darks. With Bistre, fill in the texture spots you see on the tree. Reinforce them in some areas with some Walnut Brown. Dark Chrome Yellow placed on the right side is next
to begin the reflected light. See tree reference photo for shading and texture areas. You are moving inward from the right of the tree to layer Gold Green next to the yellow. Place this color on various texture spots as well. Sky Blue is next
to cover the whole tree. Avoid the highlight areas with Light Magenta layered very lightly over the blue for soft purplish color. Light Phthalo Blue is next, but leave some spots light and darken some as you did with the foliage. Trees have a lot of texture. Cover your tree with Cloud Blue.
  DECORATIVEPAINTERS.ORG 33
