
Page 33 - DPM3_Fall_2021_Flipbook
P. 33
Strokes
Strokes can be vertical, horizontal, circular, or a mix of them all. The combination can give even coverage.
THE BASIC STROKES:
Hatching: By placing the strokes close to each other, going in the same direction or back and forth, the paper is covered evenly and quickly.
Crosshatching: Apply the strokes in one direction and then go over them in the opposite direction for dense coverage.
Skimming: Apply with a touch-press-lift stroke, useful for fur, grass, etc.
Circular: Applied circularly to smooth under colors. Holding the Pencil
The closer your hand is to the point, the more control you have. If you hold the pencil a bit further up, you have more freedom to use looser strokes. The pencil held almost parallel renders even more flexible strokes.
I like to put at least two primary layers of colored pencil on each part of the painting before worrying about values, textures and shadow, starting at the back and working forward. The sky is the furthest back and the place to begin.
Step1–Sky
Layering and Fusing Colors
By layering or overlapping colors, you can create
another hue. Strokes are applied very close with a sharp point on your pencil. By applying different colors in different areas, being aware of shadows and values, you can glaze other colors over to blend.
Fusing: One way to combine your colors is to use odorless mineral spirits. I prefer to use a white or similar color pencil and/or a colorless blender pencil.
Pressure
Use light pressure for applying the first colors; normal pressure for middle values and to define details; and heavy pressure to vigorously burnish an area or to establish the darkest values. Of course, you have to use your judgment as you work on your art. Make it yours in any way that feels right. Press lighter or heavier as you need to. You can erase a lightly touched dark color easier than a heavily burnished light color.
The “Colored Pencil Painting Bible” by Alyona Nickelsen is a treasure trove of information on colored pencil painting.
LET’S PENCIL
Welcome to the wonderful world of colored pencils. They can mimic an oil, watercolor, pastel or just plain pencil, colored or graphite.
Using a solvent such as odorless mineral spirits, you will get an oil effect from your pencils. The colored pencil requires five to six layers of pencil before burnishing or blending (bring all the colors together). This blending smooths your different colors in each area; softens it, with no tiny white space or visible lines showing. You will use medium to heavy pressure on your pencil and small circular strokes. This burnishing is my preferred method.
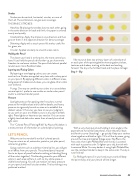
With a very sharp pencil and holding it at an angle to the paper almost horizontal (see photo), move the pencil back and forth to cover (hatching) – go quickly. Keep your strokes close together and feather-light. Fill in all the sky areas, going around the tree and stippled foliage areas. Sky Blue is the first color, then Light Phthalo Blue until the sky is covered with each successive color. To lighten your sky, burnish with Luminance White. You may darken it using Light Phthalo Blue; use the colorless blender to keep it the same color. The sky is now finished!
Tip: Rolling the pencil in your hand as you work will keep the point sharp, and your pencils will last longer.
DECORATIVEPAINTERS.ORG 31
