
Page 31 - The Decorative Painter Spring 2018
P. 31
ACRYLIC
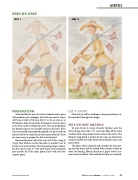
STEP-BY-STEP
STEP 1
STEP 2
PREPARATION
Wash and dry the new tin surface. Sand the entire piece with medium-grit sandpaper. Seal with one coat Jo Sonja’s All Purpose Sealer+Pale Gray Mix (1:1). In an oven set at 200 degrees, bake the piece for 20 minutes. Leave the piece in the oven until it completely cools. This tin preparation has proven to give a very durable surface to decorate. If the tin is not sealed and prepared properly, the paint will not adhere well to the surface and will scratch off easily. There are many ways to prepare tin; this is my favorite!
Basecoat the front side of the tray Soft White, using Jo Sonja’s Flow Medium to thin the paint, as needed. I use Jo Sonja’s oval wash brushes for basecoating large surfaces. For this step I used a 3⁄4" oval wash brush. Dry completely and transfer all of the main pattern lines with wax-free transfer paper.
LET’S PAINT
Note that we will be working in transparent layers, un- less specified, through this design.
WET-ON-WET METHOD
To start, brush Jo Sonja’s Retarder Medium over the entire design area with a 3⁄4" oval wash. Blot off the extra medium with a large mop brush to remove the excess. The Maxine’s mop brush is perfect for this step. An alternative method would be to wipe off the extra retarder with a soft paper towel.
The paint will be thinned with retarder for basecoat- ing and the brush will be loaded with retarder instead of water for floating. Blot the brush on a paper towel to re- move excess medium. This method will give you smooth,
DECORATIVEPAINTERS.ORG
The Decorative Painter • ISSUE NO. 2, 2016 29
