
Page 57 - The Decorative Painter - Fall 2019
P. 57
STEP 1
• Run a line 2" long of Titanium White (TW) vertically about 2" from the left side of the palette beginning 2" below the row of paint colors.
• In the lower right corner of the palette lay the following colors along an angular line, but hugging one another: TW, CL, Oxide of Chromium (OC) and IB. This is the leaf palette.
BRUSH MIXING INSTRUCTIONS
The colors for this project are brush-mixed. Use the paints dry with no medium added. The + means to pull
out a small amount of the first color listed from the paint puddle and work into the brush, then pull out the second color listed and work into the brush, blending the paint together on your palette. It may be necessary to repeat the procedure until you achieve the desired color on your brush. The – means to dry-wipe your brush and pick up the next color listed. DO NOT RINSE YOUR BRUSH IN TURP. The ( ) means that this color is optional, but if you choose to use it, use it sparingly.
Please visit rosecote.com/christmas-card-tutorial for a short tutorial on painting the poinsettias.
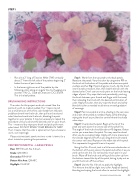
CENTER POINSETTIA – LARGE PETALS
Base: RR+TW with No. 6 brush Shade: QM+(BC)
Overstroke: RR+W-W
Bottom Vein Area: QM+BC Highlight: CL+W-W
Step 1: Work from the top petal to the back petals. Basecoat the petals. Vary the color by using more RR on the brush at the bottom of the petals and where one petal overlaps another. Tip: If paint drags too much, dip the brush into the walnut medium, blot, then load the brush with the desired color. Don’t use too much paint on the brush leaving ridges of paint. Dry-wipe the brush periodically, pinching the brush between your thumb and finger with the towel, then reloading the brush with the desired combination of color. Apply the color, then dry-wipe the brush and softly blend the color as needed to achieve a smooth gradation
of coverage.
Step 2: Paint one petal at a time, shading in the vein area and under other petals as needed. Apply, softly blending, wiping the brush as you blend to control where the shade value stays.
Step 3: Overstroke the petal. Begin at the tip of the petal and work down the narrow side of the petal first.
The angle of the brush should be about 45 degrees; flatten out as you move down the petal. You may need to reload after you do a couple strokes. Apply with more pressure on the outside edge and lift off as you drag the brush toward the center vein area. Repeat on the wider side of the petal. This represents the growth lines in the petal.
Using the No. 4 brush, tuck in a little more shade color at the bottom of the vein area on the petal and soften it as you work up the vein line. Do not load too much paint in your brush. Wipe off the brush and softly pull the color up from the bottom toward the tip of the petal, letting it play out as you lift the brush off the surface.
Step 4: Use the No. 6 brush to apply the highlight.
This mixture should be a light ivory color. Apply as desired, blending and wiping the brush often to control the highlight.
DECORATIVEPAINTERS.ORG 55
