
Page 81 - The Decorative Painter - Fall 2019
P. 81
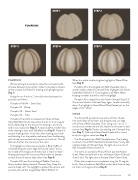
  PUMPKINS
STEP 1
STEP 2
   STEP 3
STEP 4
STEP 5
PUMPKINS
When dry, add a smaller, brighter highlight of Warm White (see Step 5).
Pumpkin #3 is first shaded with Milk Chocolate, then a smaller, darker shade of Charcoal Grey. Highlight with Desert Sand+Warm White (1:1). Then brighten with Warm White, keeping it smaller and within the first highlight.
Pumpkin #5 is shaded first with Fawn+Charcoal Grey (1:1). The second shade is Charcoal Grey; again, smaller and softly done. The highlight is Fawn+Warm White floated just on the edges of the “lobes.”
STEMS
The #1 and #4 pumpkins have stems of Fawn. Shade
first at the base of the stem and along the top cut edge with a float of Milk Chocolate. Then, using a no. 1 or no. 2 round brush, stroke some of this shade into the stem to add texture (see Step 6). Darken the shading with Charcoal Grey (see Step 7). Add some Desert Sand streaks with a round brush for a lighter value (see Step 8).
The #2 pumpkin has a Milk Chocolate stem. The shading is a brush-mix of Milk Chocolate+Charcoal Grey. Finally, add a darker shade of Charcoal Grey. The light value is a mix of Milk Chocolate+Desert Sand (1:1).
The stems on pumpkins #3 and #5 are painted Antique Green. Make the dark with a mix of Antique Green+Charcoal Grey (1:tch). The light value is Antique Green+Desert Sand.
When the pumpkins are completed, using the 3⁄4" angular brush, float a shadow of Soft Black underneath them to help set them on the ground (see Step 5).
When painting the pumpkins, leave the narrowest width of space between the pumpkin “lobes” to be able to discern where to place the floats for shading and highlighting (see Step 1).
Using the no. 4 and no. 2 round brushes basecoat the pumpkins as follows:
Pumpkins #1 & #4 – Dove Grey Pumpkin #2 - Burlap
Pumpkin #3 – Desert Sand Pumpkin #5 – Fawn
Pumpkins #1 and #4 are shaded with floats of Dove Grey+Soft Black (1:tch). Use either the 3/8", 1⁄4" or 1/8" angular brush depending on the area you’re working in and try to walk it out a ways (see Step 2). A second darker, smaller (less wide) shading is done with Soft Black (see Step 3). Keep this second shading softer. To do this, when loading your brush and blending it on the palette, walk away from the blending path to help remove/reduce the paint on the brush. This will dilute and soften the intensity of the color.
The highlight on these two pumpkins is Blue Chiffon. It is floated along the outer edge of the side “lobes” and in the middle of the large center lobe. Use a “back-to-back” floating technique for the center. Remember to dampen surface first and mop to help soften (see Step 4).
Pumpkin #2 has a first shading of Pebble. Once dry,
float a smaller, darker shade of Charcoal Grey. Keep this second shade soft. The highlight is applied the same as with pumpkins #1 and #4, using Burlap+Warm White (1:1).
DECORATIVEPAINTERS.ORG 79
