
Page 88 - The Decorative Painter - Fall 2019
P. 88
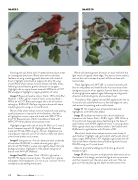
IMAGE 9
IMAGE 10
  Starting with tail, blend a bit if needed where values meet to create good dimension. Blend a bit within individual feathers on wing, creating growth direction with chisel of brush. Highlight a few feather edges with dirty W using chisel. Blend where values meet on breast and belly areas, following natural feather growth direction once again. Highlight a bit on upper breast area with WR+a bit of CYP. Blend edges of highlight to regain gradation of value.
Image 7: Basecoat head as shown: Dark = BS+a little RU. Medium = WR. Light on nape of neck, crown and beak = WR+a bit of CYP. Basecoat tongue with a bit of medium value gray: B+RU+W. Add eye ring around eye with same medium grey mix using no. 0 round brush.
Blend a little where values meet on head and neck, paying careful attention to natural lie of the feathers. Add bits
of highlight on crown, nape and cheek with WR+CYP+a
bit of W. Basecoat rest of both mandibles of beak with WR+CYP+W and blend where values meet.
Highlight tongue with a bit of dirty W. With no. 0 round brush, basecoat eye with B. Highlight with W. Basecoat mask with B+tad of BS using no. 2 brush. Edge black mix into adjacent reds with corner of chisel to make line where colors meet broken and uneven.
Image 8: Using the no. 4 brush, basecoat dark underside of branches: B+RU+W, in a dark value of gray. Light = dirty brush+W+FUB in a value only slightly darker than the background value. Highlight in a few places along top of branch with W+FUB. Reblend.
Images 9 and 10: Leaves: Dark = B+SG. Light value = SG+RS+W. Apply mixes as shown. The dark mix in places will appear a bit transparent. Do not try to “correct” for the transparency by adding more paint.
Blend with lateral growth direction on each leaf with the light touch of a good chisel edge. You want to show realistic texture but not to scrape the paint off the surface with hard strokes.
Place highlights with W+FUB, in a value that looks soft blue on the palette and looks like the hue and value of the background acrylic when applied. Start to blend a bit when all strong lights are applied, again following natural growth direction and blending only where values meet.
Final blend. With slightly thinned BS, applied with the no. 0 round brush, add blemishes on a few leaf edges to carry reds across the painting and to add interest.
Image 11: This image shows all leaves blended and highlighted, with blemishes added.
Image 12: I added two feathers for a bit of additional interest on the frame. Dark = B+BS. Light = WR. With no. 0 round brush, basecoat downy feathering at the base of each feather with W+BS, slightly thinned, in varying values. With a good chisel, lay in feather shaft in left feather with B+RU and in right feather with W+a bit of RS.
Blend with chisel where values meet on main body of each feather. Highlight red next to both shafts with a bit of clean, bright WR+a little CYP. Highlight right shaft with W. Add a few fibers of darker downy feathering with thinned RU+BS using no. 0 round brush.
Allow to dry before adding any final strong values of shadow or light.
Image 13: When we paint multiple similar elements such as the leaves in this design, we tend to figure out our process and then repeat it just the same, over and over. That can give our finished painting less depth and dimension than
86 TheDecorativePainter • FALL 2019
