
Page 86 - The Decorative Painter - Fall 2019
P. 86
colors. Wipe brush on a paper towel after applying paint to surface, but before beginning to blend. Blend colors where they meet, using a dry brush and short strokes.
Don’t blend randomly over the entire area; just blend on the line where colors come together, creating a new value and hue with the process of blending. To blend overall will cause loss of values and clarity.
Image 1: Use the inked design to transfer to the painting surface.
A perfect transfer goes a long way toward a perfect finished painting.
STEP BY STEPS
Image 2: Palette. Colors are listed and laid out with most frequently used colors in the bottom row and those less-used in the top row. From the bottom left: Ivory Black (B), Titanium White (W), Raw Sienna (RS), Raw Umber (RU), and Burnt Sienna (BS). Top row: Sap Green (SG), Cadmium Yellow Pale (CYP), Winsor Red (WR) and French Ultramarine Blue (FUB).
Example of loading zones and how to load the brushes: pull out the paint in a sparse, evenly distributed loading area about 2" long and 1/2" wide. Load brush from loading zone, and do not pull fresh paint into it
until it’s dry and has little paint left.
Choosing Brush Sizes: Use the smaller brush sizes, nos. 0, 2, and 4,
for the smaller areas and elements of the design. But within that range, choose the largest size that is comfortable to achieve the detail necessary. I always keep my no. 8 bright brush handy; while I don’t often paint with that size, I use it dampened with odorless thinner for cleanup, because I find the larger bristle base gives better pressure for removing any messy paint or graphite lines around the edges of the design. Once a brush is listed in the instructions, stay with that size until it says to change to a different size.
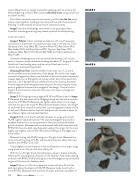
Image 3: Pull loading zones at edge of B, W and RU as shown in Image 2. Basecoat the dark areas of the fledgling’s wings and tail with a medium value mix of B+RU+W. Basecoat the lighter values shown in this image with that mix plus a bit more W. Blend a little between values, with length of each feather to smooth brushstrokes. Lay tracing paper overlay on top of wet paint. Redraw feather lines with ball point pen to make it easier to see shadows, lights and individual feathers.
Image 4: With no. 4 brush, add dark shadows on wings and tail with RU+B. Lighter values/dirty brush+ W. Use chisel edge of dry brush to establish feather lines, to indicate feather fibers and individual feather growth direction. Basecoat dark central area of belly and breast area with B+RU+W, the same dark value basecoat used on the wings. On the outer edges, use a lighter value of Mix+W to base, fluffing out the edges just a bit to soften.
Basecoat the leg with B+RU using a no. 2 bright brush. Basecoat the rusty areas of the wings with BS, and the dark scapulars above the rusty feathers with B+RU+ a bit of W.
Detail slightly curved shapes of a few small feathers in the upper wings using chisel of no. 2 brush with a bit of dirty W.
With the no. 4 bright brush, blend between values in breast and belly, following the natural growth direction of the feathers. Add a little shading as shown with B+RU. Fluff a little lighter into white edges and pull outward to give a little more of a feathery look.
Image 5: Use a no. 2 brush to basecoat throat with dirty W and the dark neck above the breast with RU+B. Basecoat inside mouth with a bit of BS+RU. Basecoat lower portions of upper and lower mandibles of
84 TheDecorativePainter • FALL 2019
IMAGE 3
IMAGE 4
IMAGE 5
