
Page 102 - The Decorative Painter Winter 2014
P. 102
mIxED mEDIA
INKING
Lay a spare sheet of paper under your arm and hand; each time you work on a new section move your paper. This will keep the drawing free from smudges or oil from your skin. Use the white Gelly Roll pen to correct small mistakes. Use the 05 black Micron pen to outline and block in the black lace on the dress. Use the same pen to outline the shoes, belt, purse handle, and heart flowers. When inking the black lace on the dress it is easier to block in solidly, adding the dots later with the white Gelly Roll pen. The black lettering above the heart flowers is created with the 05 pen.
Use the 01 black Micron pen to outline the smaller details areas, such as the heart flowers and ruffle on the purse. Use the 005 black Micron pen for the facial details, hair detail, and leaf and grass details. Add highlight dots on the flowers with the white Gelly Roll pen.
Color the lips, earrings, and fingernails using the red 01 pen.
SHADING
Referring to the close-up of the face (below), shade around the eyes, nose, and mouth with the 4H pencil. Shade and reinforce the hair detail with the 2B pencil, and use the 4B around the face and part in the hair.
Shade the purse ruffles, body, arms, and legs beginning with the 4H and then reinforcing with the 2B. Reinforce the back leg more heavily using the 4B pencil.
Shade the ground area under the flowers and the cor- ners of the piece with the 2B and 4B pencils.
Add lettering to the large gray heart cutout with the 08 black Micron pen. Using the 4H pencil, shade around the edge of the cutout. Now reinforce this with the 2B pencil. Spray the front of the cutout with Preserve Your Memo- ries II, and then allow it to dry completely. Apply a coat of DecoArt Matte Decou-Page to the back of the heart, po- sition it in the center of the red frame, and smooth out any air bubbles that may be underneath. Using a damp paper towel, wipe away any excess Decou-Page that might
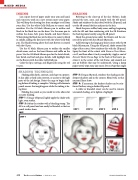
SHADING TECHNIQUE
Shading adds depth, contrast, and shape to a project. It also adds a third color, interest, or accent to the light parts of the ink design. Resist the urge to begin shad- ing before all inking is complete. Waiting will eliminate pencil smears that might appear while the inking is be- ing done.
Holding the pencil as you would to write allows for accurate shading.
STEP 1: Using a 4H pencil, lightly apply the shade with light, even strokes.
STEP 2: Soften the strokes with a blending stump. The 4H is a soft pencil and can easily be blended so that no pencil strokes show.
FACE
STEP 3: Using a 2B pencil, reinforce the shading on the deepest shadows and in the corners. Blend well, so that no pencil lines show.
STEP 4: If necessary, the darkest shades can be rein- forced further, using a darker 4B pencil.
A white or kneaded eraser can be used to remove unwanted shading, or to lighten a highlight.
STEP 1
STEP 2
STEP 3
STEP 4
STEP 1
STEP 2
100 The Decorative Painter • ISSUE NO. 4, 2014
dEcOratIvEpaINtErS.Org
