
Page 23 - The Decorative Painter Winter 2014
P. 23
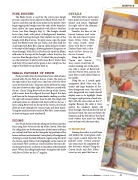
 PINE BOUGHS
The Blade brush is used for the entire pine bough process. Load the chisel edge of the Blade brush with Ev- ergreen, and then tap off excess paint on the palette. Now begin tapping the boughs onto the ends of the branches. Next, follow the same procedure with Hauser Medium Green (see Pine Boughs Step 1). The boughs should have a lacy look, with plenty of background, branches, and trunk showing through. Now darken the tips of the boughs with Black Green. To apply snow, wipe the paint fromtheBladebrush(donotwash),andthenloadthe chisel edge with Baby Blue. Tap on a delicate layer of snow to the tops of the boughs, allowing plenty of the greens to show through. With Hi-Lite Flesh on the tip of the Blade, add snow to the tops of the boughs, where they face the sun (see Pine Boughs Step 2). To detail the pine boughs, use the mini liner to add a touch more Burnt Umber here and there. If too much of the green is lost, simply use the edge of the Blade to tap them back in.
SMALL PATCHES OF SNOW
Each post and rail on the front fence bears a dab of snow created with Hi-Lite Flesh on the no. 1 liner. The posts on the right side of the road have a thin line of Hi-Lite Flesh snow on their left sides. The posts on the left bear the same thin line of snow on their right sides. Both are created with the no. 1 liner. Using Buttermilk on the tip of the Crown, pull in snow from the edges of the road. Repeat this here and there on the foreground snowbanks, making sure that the right side remains darker than the left. The sleigh trail and hoof prints are detailed with Buttermilk on the no. 1 liner. Using Buttermilk on the tip of the Crown, dry-brush drifts of snow through the runner trails and hoof prints. Using the mini liner and a touch of Blue Mist, create a layer of snow resting on each windowsill.
SIDING
Dry-brush the lines for the siding on the house and the barn using Raw Sienna on the tip of the Crown. Note that the siding lines on the bottom parts of the house and barn are vertical, and those on the triangular top portions of the house and barn are horizontal. Leave plenty of background showing to create the look of boards. Again using the tip of the Crown, apply Yellow Ochre highlights to the centers of each board. Now use the no. 1 liner and Raw Sienna to de- tail the pattern lines, as shown in the photo of the finished piece. Where the siding boards meet, strengthen the shade with Burnt Umber on the 1⁄2" angular.
DETAILS
With Pale Yellow on the mini liner, paint the house’s window frames and panes. Highlight the right side of the chimney in the same manner.
Transfer the lines of the horse’s harness and reins. Use the mini liner to paint them Yellow Ochre. With the same brush, detail them with Burnt Umber. Darken them with a thin wash of Raw Sienna on the no. 3 round.
Using the tip of the
Crown and Neutral
Grey, create a hazy line of smoke winding out of the chim- ney. Mix a touch of Buttermilk into the Neutral Grey, and use the mini liner to add subtle details to the smoke.
Using the no. 5 round, apply transparent Black Plum over the trunks and large branches of the three foreground trees. One side of each foreground tree trunk should display snow as its highlight. Shade
the upper-right portion of each win- dow with the same color on the 1⁄2" angular. Because the color is trans- parent, the windows’ details will show through. Now shade the left side of the house’s roof, the area just below the chimney, and the left sides of the sheds’ roofs (where they meet the building next to them) with the same color.
FINISHING
Staining the wicker tray will tone and darken the wood grain, mak- ing a quiet, neutral frame for the painted scene. Several prepara- tory steps must be completed be- fore the tray is stained. Using the Crown brush and Pale Yellow, cover up any paint that has ac-
ACRYLIC
   dEcOratIvEpaINtErS.Org
The Decorative Painter •
ISSUE NO. 4, 2014 21
