
Page 33 - The Decorative Painter Winter 2014
P. 33
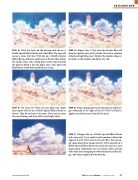
 STEP 3: Paint the water on the horizon with the no. 6 Keith’s Special Effects Brush and Cobalt Blue. The tape will ensure a clean, level line. With the no. 12 Keith’s Special Effects Brush, add some small areas of Powder Blue within the clouds. Then, with a damp paper towel, wipe and pull the paint to blend it into the paper areas. Your paint will blend better if you work small areas at a time.
STEP 5: Put some Pro White on your paint tray. Apply heavy spots with the no. 4 Keith’s Special Effects Brush as shown. They do not have to be exact. These are the areas the sun is hitting, and they will be very bright white.
STEP 4: Repeat Step 2. This time the Powder Blue will form the shadow areas of the clouds. You want a variation of dark and light blue spots. Think of the clouds as big cot- ton balls, so the shadows should be very soft.
STEP 6: Wrap a damp paper towel around your index fin- ger. Softly pull at the edges of the Pro White to blend it. Apply more white areas if you feel the need.
STEP 7: Dampen the no. 4 Keith’s Special Effects Brush with water only. Use a small circular motion to blend the edges of the Pro White into the Powder Blue. You can ap- ply some detail to the clouds with Pro White and the no. 6 Keith’s Special Effects Brush (or any brush that has a very sharp point). Remember, you can always soften any line with water and a damp paper towel around your index fin- ger. Add some seagulls into the blue sky.
SKILLBUILDER
       dEcOratIvEpaINtErS.Org
The Decorative Painter • ISSUE NO. 4, 2014 31
