
Page 47 - The Decorative Painter Fall 2015
P. 47
ACRYLIC
STEP-BY-STEP
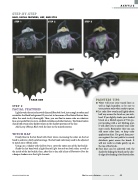
HAIR, FACIAL FEATURES, HAT, AND EYES
STEP 1
STEP 2
STEP 3
STEP 2
FACIAL FEATURES
BACK SIDE
PAINTERS TIPS:
n Water will erase your traced lines as well as high humidity, so be sure to trace pattern only when ready to paint.
n Let color flow evenly and lightly about half way across the brush as you side- load. If you lightly stroke your loaded brush on a folded square of Viva pa- per toweling with a wet blotting spot, it will allow you to control your color more easily. Remember that you can add more color later, so keep color application faint. Use good, firm pres- sure against the wet palette to evenly distribute paint across the brush. It will not work to stroke gently up on the toe of the brush.
n Fine lines can be achieved with the shader by sliding the brush on the chis- el edge after loading it for floated color.
Lightly wash the entire face with thinned Bleached Sand, just enough to soften and neutralize the black background. If you start to lose some of the floated feature lines, allow the wash to dry thoroughly. Then, you can float in more color on whatever lines are needed for you to re-establish wrinkles and other features. The floated colors should still retain some darker values on the shadow portions of the face.
Add Lamp (Ebony) Black with the liner in the mouth interior.
WITCH HAT
Evenly float in the hat band with Shale Green, increasing the color on the hat band to achieve a fairly solid coverage. The hat band color may need to be adjusted to match your ribbon color.
Using a no. 2 shader with Golden Straw, cover the entire area of the hat buckle.
Shade the hat band with a light float of Light Avocado on both sides, as well as the inside of the hat buckle; then, after this is dry, add a hint of Plantation Pine for a deeper shadow over the Light Avocado.
DECORATIVEPAINTERS.ORG The Decorative Painter • ISSUE NO. 3, 2015 45
BAT
