
Page 48 - The Decorative Painter Fall 2015
P. 48
ACRYLIC
With the liner brush, shade the hat buckle with a fine line of Raw Sienna and highlight with Banana Cream. Use the no. 2 shader with Snow (Titanium) White to create the hat buckle’s shine.
Use the no. 2 shader to lightly highlight the forward areas of the hat brim and the middle of the top part with additional Dove Grey.
EYES
Float a hint of Golden Straw with the no. 4 or no. 6 shader in the iris areas of the eyes. Highlight with Banana Cream for the iris using the no. 2 shader in the bottom left area for a reflected light.
Add Lamp (Ebony) Black pupils with the liner as well as a bit of upper lash line and a hint of lower lash line. Fin- ish off her eyes with very light, subtle lashes; don’t get too heavy with the lashes as this witch isn’t wearing mascara. Add a Snow (Titanium) White shine dot in upper right area of the pupil.
HAIR
Add a hint of Wild Orchid to separate hair strands and bring forward some top layers of hair using the liner or the chisel edge of the no. 2 shader. First, highlight forward strands with more Orchid+Neutral Grey (2:1), if needed, and random shines with Bleached Sand or Snow (Titani- um) White. Add Royal Purple to make it appear like some back strands are tucked back further behind other strands. Sometimes, all you’ll need is a fine line of dark to separate hair strands.
THE WITCH
If needed, increase the value on various hair strands with Orchid+Neutral Grey (2:1) to bring more forward.
To give her complexion a slightly greyed-greenish cast without losing the Bleached Sand facial features, apply a very light wash of Shale Green.
For a free design at actual size, affix two first-class stamps to a #10 SASE and send to:
The Decorative Painter
Attn: WITCHY WELCOME
ISSUE 3 - 2015
393 N. McLean Blvd.
Wichita, KS 67203-5968.
Allow four weeks for delivery.
Design is 40% of original. Enlarge 250% for actual size.
Add a small band of cast shadow under the hat brim against her head with Lamp (Ebony) Black.
THE BATS
Float Dove Grey very lightly with the no. 6 shader around the outer edges of the outline of each bat. Then, lightly float the same color to accent the shape of the bat’s head and body area.
Draw in the eyes and mouth using a liner with Dove Grey; then, add a bit of Lamp (Ebony) Black for the pupils and a Snow (Titanium) White shine dot.
Sideload a no. 6 shader with Dove Grey. Very gently dab the near corner of the brush, starting at the top point and fading downward, to create the dividing sections on the wings. If desired, you can add highlighting sparingly with some Snow (Titanium) White.
FINISHING
With the 1" brush, varnish at least two coats to protect and brighten the project pieces.
To tie the plaque onto the bat hanger, you will need two (2) 30" pieces of 1 1⁄2" wide wired ribbon.
Laugh wickedly because you are finished!
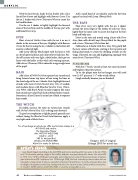
artist’s sketch
Jean Zawicki began rosemaling in the mid-1960s and took up teaching within two years. In the late 1960s and ’70s decorative painting caught on like wildfire, and there was great demand for classes. She joined SDP in 1976. From 1978 to 2008 Jean travel-taught, and to date she has written 29 books and dozens of packets. Jean held booths at SDP Conferences from 1978 through 2000. She finds it refreshing to have students who are interested in a large variety of subjects, especially her favorites: fruit and flowers. Currently, retirement allows Jean to indulge in her passion to create fired, hand-painted china. You can write to Jean Zawicki at 430 Louisiana Ave., St. Cloud, FL 34769; call her at (407) 892-6383; or email her at jzawicki@cfl.rr.com.
46 The Decorative Painter • ISSUE NO. 3, 2015
DECORATIVEPAINTERS.ORG
